-
Notifications
You must be signed in to change notification settings - Fork 24
Tutorial Ceiling Fan Light
Sean Ater edited this page Feb 24, 2018
·
16 revisions
This is an introduction tutorial to help teach through practice, it covers:
- Setting up lights that play well with both Global Illumination
- Creating a server item/object based on an existing server item
- Custom interactions and interaction tooltips
- Using WorldObject.AnimationState to trigger both UnityEvents and Animator events
(Thank to Phlo for donating the model for this tutorial!)

Start a new Unity project and install Eco ModKit Installation
I usually copy and modify the Template scene by:
- opening Assets/EcoModKit/TemplateScene
- created a new folder Assets/Tutorial
- File->Save Scene As -> Assets/Tutorial/Tutorial.unity
- Create an icon in an image editing program (either draw one or take a screenshot of your model once it's done)
- Select the icon file in unity and in the inspector tab change "Texture Type" to "Sprite (2D and UI)" then hit Apply at the bottom of the inspector tab.
- Select the Items transform in the Hierarchy tab and enable it by checking the box top-left in the Inspector tab
- If you can't see anything in the scene view Double click on Items in the Hierarchy tab to focus More Scene Navigation Help
- Assign the Icon and fix the color tint:
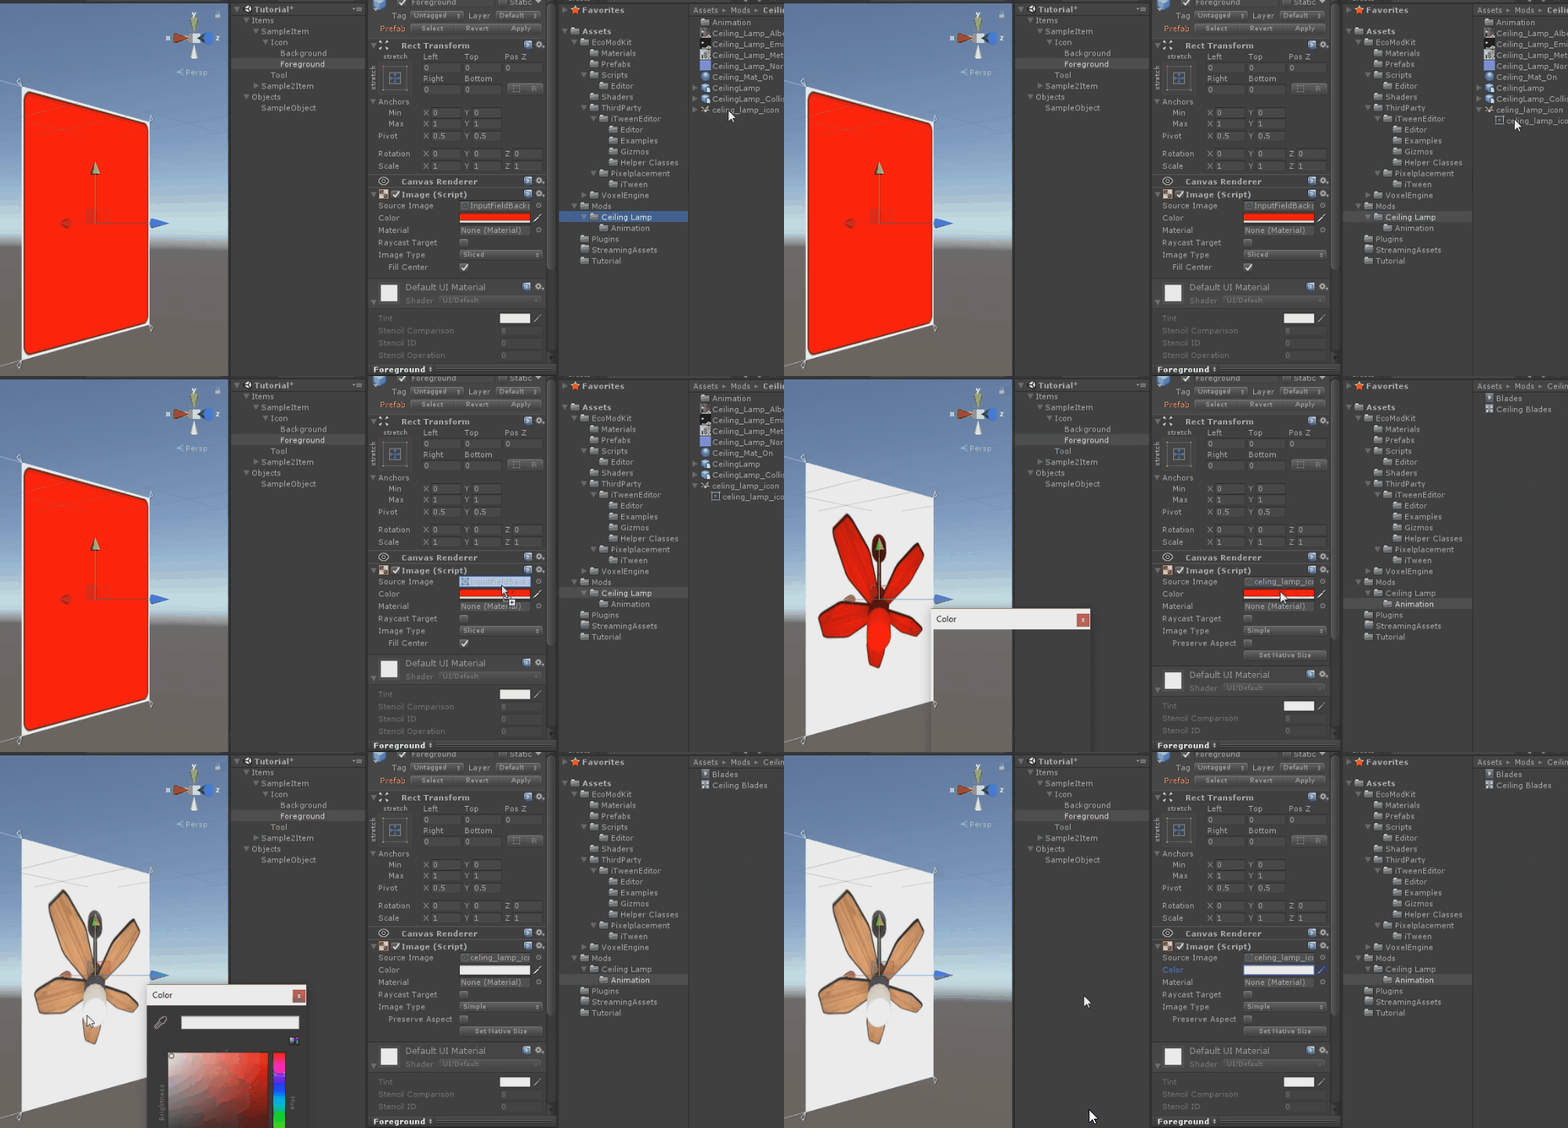
- Renamed SampleItem to CeilingFanItem and deleted SampleItem2
- Select the Objects transform in the Hierarchy tab and enable it by checking the box top-left in the Inspector tab
- If you can't see anything in the scene view Double click on Objects in the Hierarchy tab to focus More Scene Navigation Help
- I renamed SampleObject to CeilingFanObject then dragged the model to set it as a child (Note I misspelled CeilingFanObject here and had to go back and fix it later. Don't do that, spelling matters 😅)
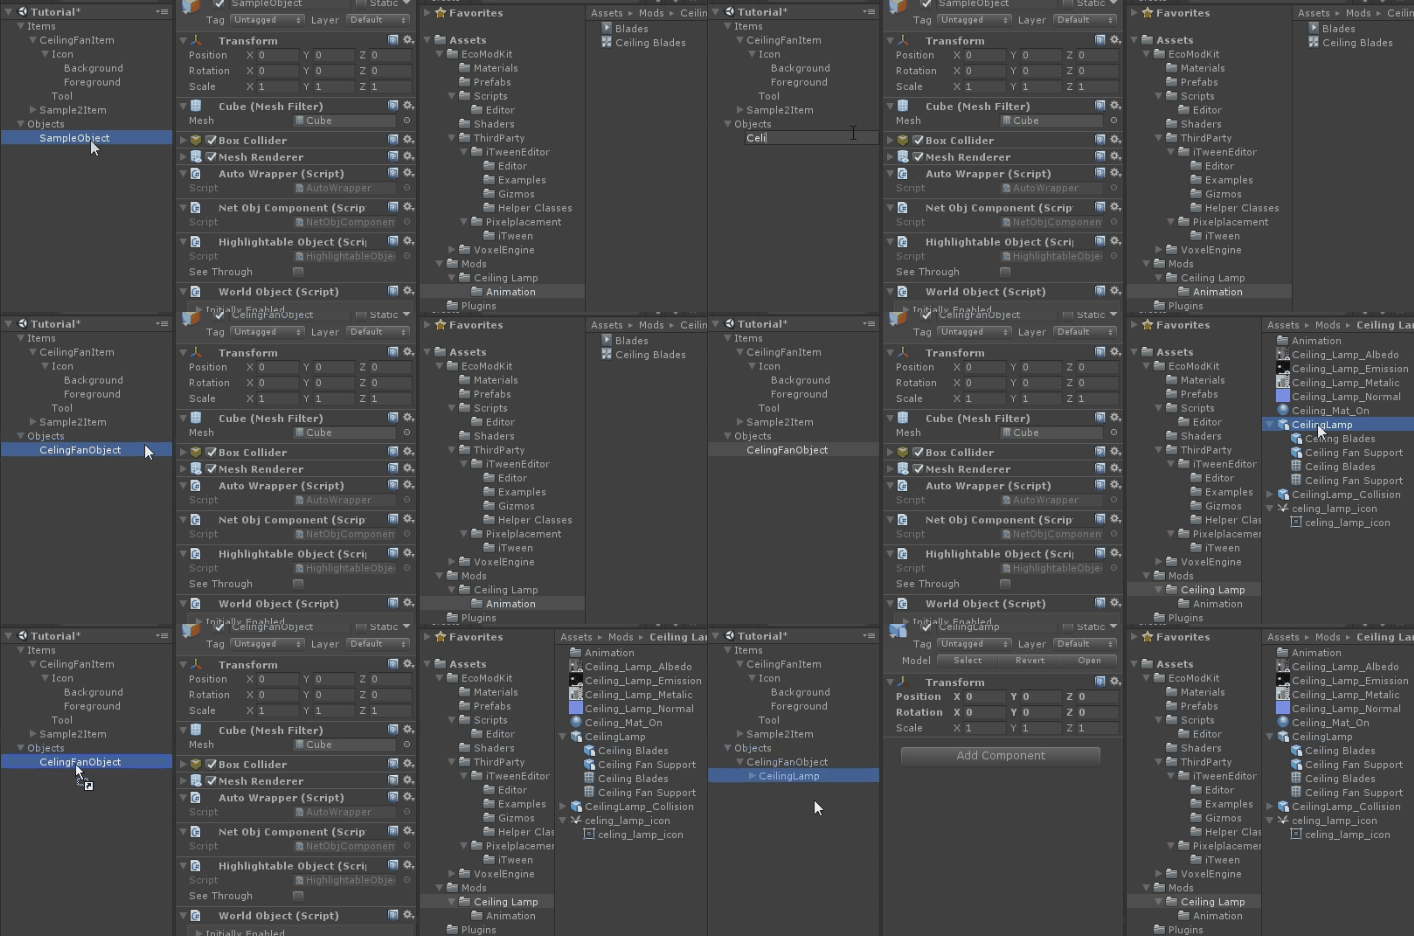
- The SampleObject Cube is already aligned to game voxels, so we want the base to align with the top
- In this example We're not using the renderer on the root CeilingFanObject so I removed it along with the Cube collider.
- Select the materials used by the object and ensure the Shader is set to "Curved/Standard"
- Lets go ahead and run the first test at this point
- Do a Menu File -> Save Project to ensure misc things like material changes get saved.
- Then Menu ModKit -> Build Current Bundle
- Browse to your server folder then create a new folder under Mods, I used Mods/Tutorial and saved as tutorial.unity3d
- The top level transforms will automatically get deactivated every time you build bundles. (This is required for our mod system and it's easy to forget to do this so it's now automated)
- The CeilingFan seems pretty similar to an ElectricWallLamp so I copied Mods/AutoGen/WorldObject/ElectricWallLamp.cs to Mods/Tutorial/CeilingFan.cs
- Then did a search/replace of "ElectricWallLamp" with "CeilingFan" and "Electric Wall Lamp" with "Ceiling Fan"
- Start the server and connect to it
- Within the ServerUI go to the ModKit tab and set LiveUpdateUnityFiles to true (so we don't have to restart the server if we reexport the bundle)
- Also make sure you're set as an Admin the Users tab
- Connect and give yourself a CeilingFan and power source with
- /give CeilingFan
- /give WindTurbine (if you don't have a power source & place nearby)
- Place the Ceiling Fan, it should appear but not do anything yet
- You can use any text editor to edit the server scripts but if you plan on getting into it I'd highly recommend getting
- Syntax highlighting - Visual Studio Community
- Code Completion - For this tutorial I tried using Pradoxzon's DumpDlls which worked very nicely.
- To make things interesting, lets have 2 switches for the fan.
- Delete the line
[RequireComponent(typeof(OnOffComponent))](one switch is boring!) - Here is the modified CeilingFanObject code with comments included where something changed
    public partial class CeilingFanObject : WorldObject
    {
        // Added FanOn and LightOn so we have 2 switches
        // which will get saved thanks to the Serialized attribute
        [Serialized] public bool FanOn = true;
        [Serialized] public bool LightOn = true;
        public override string FriendlyName { get { return "Celing Fan"; } }

        protected override void Initialize()
        {
            this.GetComponent<MinimapComponent>().Initialize("Lights");
            // Added custom power consumption
            this.InitPowerConsumption();
            this.GetComponent<PowerGridComponent>().Initialize(10, new ElectricPower());
            this.GetComponent<HousingComponent>().Set(CeilingFanItem.HousingVal);
        }

        // Added this to change power consumed based on if the light & fan are enabled
        public void InitPowerConsumption()
        {
            float power = 0f;
            if (FanOn)
                power += 50f;
            if (LightOn)
                power += 50f;

            this.GetComponent<PowerConsumptionComponent>().Initialize(power);
        }

        // We will be sending the server "Fan" and "Light" when their switches
        // are right clicked, also update the power consumed when switches are toggled
        public override InteractResult OnActRight(InteractionContext context)
        {
            if (context.Parameters != null && context.Parameters.ContainsKey("Fan"))
            {
                FanOn = !FanOn;
                this.InitPowerConsumption();
                return InteractResult.Success;
            }

            if (context.Parameters != null && context.Parameters.ContainsKey("Light"))
            {
                LightOn = !LightOn;
                this.InitPowerConsumption();
                return InteractResult.Success;
            }
            return InteractResult.NoOp;
        }

        // Finally we send the Fan & Light states to clients using Animated States
        // Operating indicates that room/power requirements are fulfilled
        public override void Tick()
        {
            base.Tick();
            SetAnimatedState("Fan", this.Operating && FanOn);
            SetAnimatedState("Light", this.Operating && LightOn);
        }
}- For bonus points you might want to vary the Housing value based on Fan/Light states
- You need to restart the server so these code changes take effect, might as well do that now
- Back in Unity I added 2 chains for switches and changed their colliders to be triggers so you can walk through them. (just using cylinders/spheres for this example)
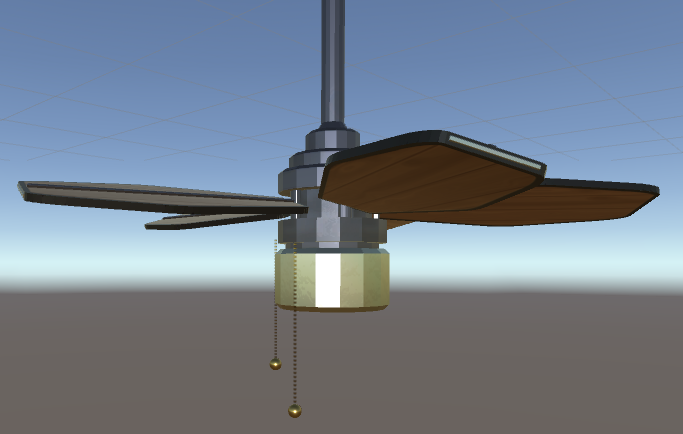
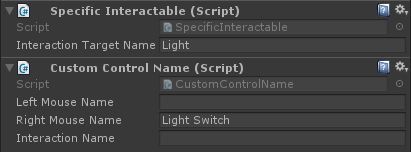
- On the chains add a SpecificInteractable component using the same strings from the server code. Now interacting with these colliders will send those strings to the server to toggle light/fan state. Also add a CustomControlName component to display which interactions work and what each switch does. Set one to "Light" and the other "Fan"
- There are many ways to accomplish things in unity. For the fan rotation we could use a tween script, import an animation from a modeling program or make our own animation in unity. In this case we will make one in unity and use an animation controller to demonstrate how to work with animation controllers.
- Setting up the Animator
- Select the CeilingLamp file in the Project tab and in the Inspector tab click "Rig" and change Animation Type to Generic then hit Apply. This will create an Avatar as a child of the model.
- In the Project tab right click in the files area and do Create -> AnimationController
- Select the CeilingLamp in the Hierarchy tab and add a Animator component if it doesn't already have one. Then assign the Avatar from the model and drag the new animation controller into the controller slot.

- Creating a Rotation Animation
- Create a new animation by opening the Animation window and creating a new clip while the CeilingLamp is selected.
- Hit record and then rotating the fan automatically adds the rotation to the clip, then we set the end of the clip to 360 so the fan completes a rotation. You can adjust animation curves for finer control of the motion.

- Animation Controller Setup
- Double click on the animation controller to open the editor. Notice the animation clip we just created is already included.
- Right click in the grid area and Create State -> Empty then rename it to Off. This will be our off state so it doesn't need an animation.
- Make transitions between the on/off states and add a parameter named 'Fan' (This name must match the AnimationState name defined on the server, the WorldObject script will automatically keep it in sync with the server variable)
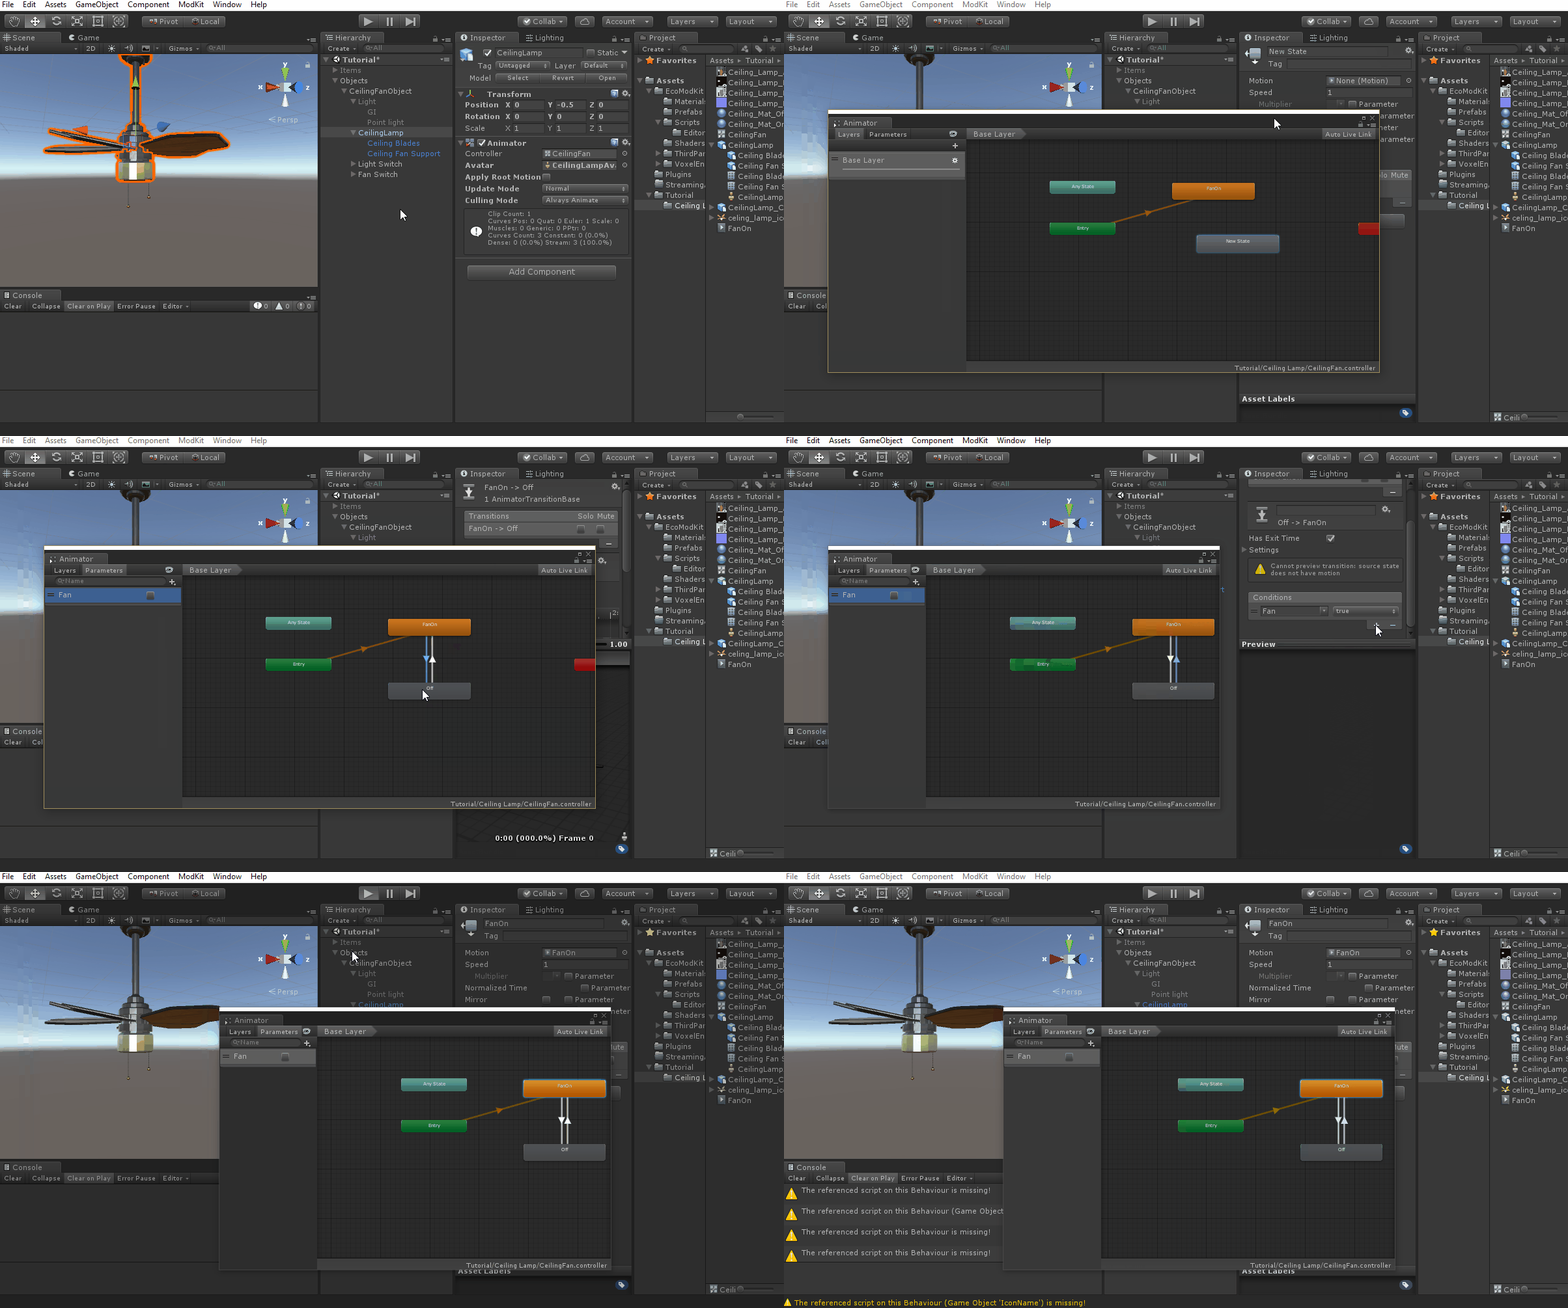
- You can test the Fan with ModKit -> Build Current Bundle then reconnect to the server. The Fan switch should work now!
- Material Swapping
- The model uses an emission texture that covers the light emitting area. One efficient way to make the light toggle on/off is to create a duplicate material with the emission turned off.
- We will also assign the off material to the light so it doesn't flicker on -> off when placing.
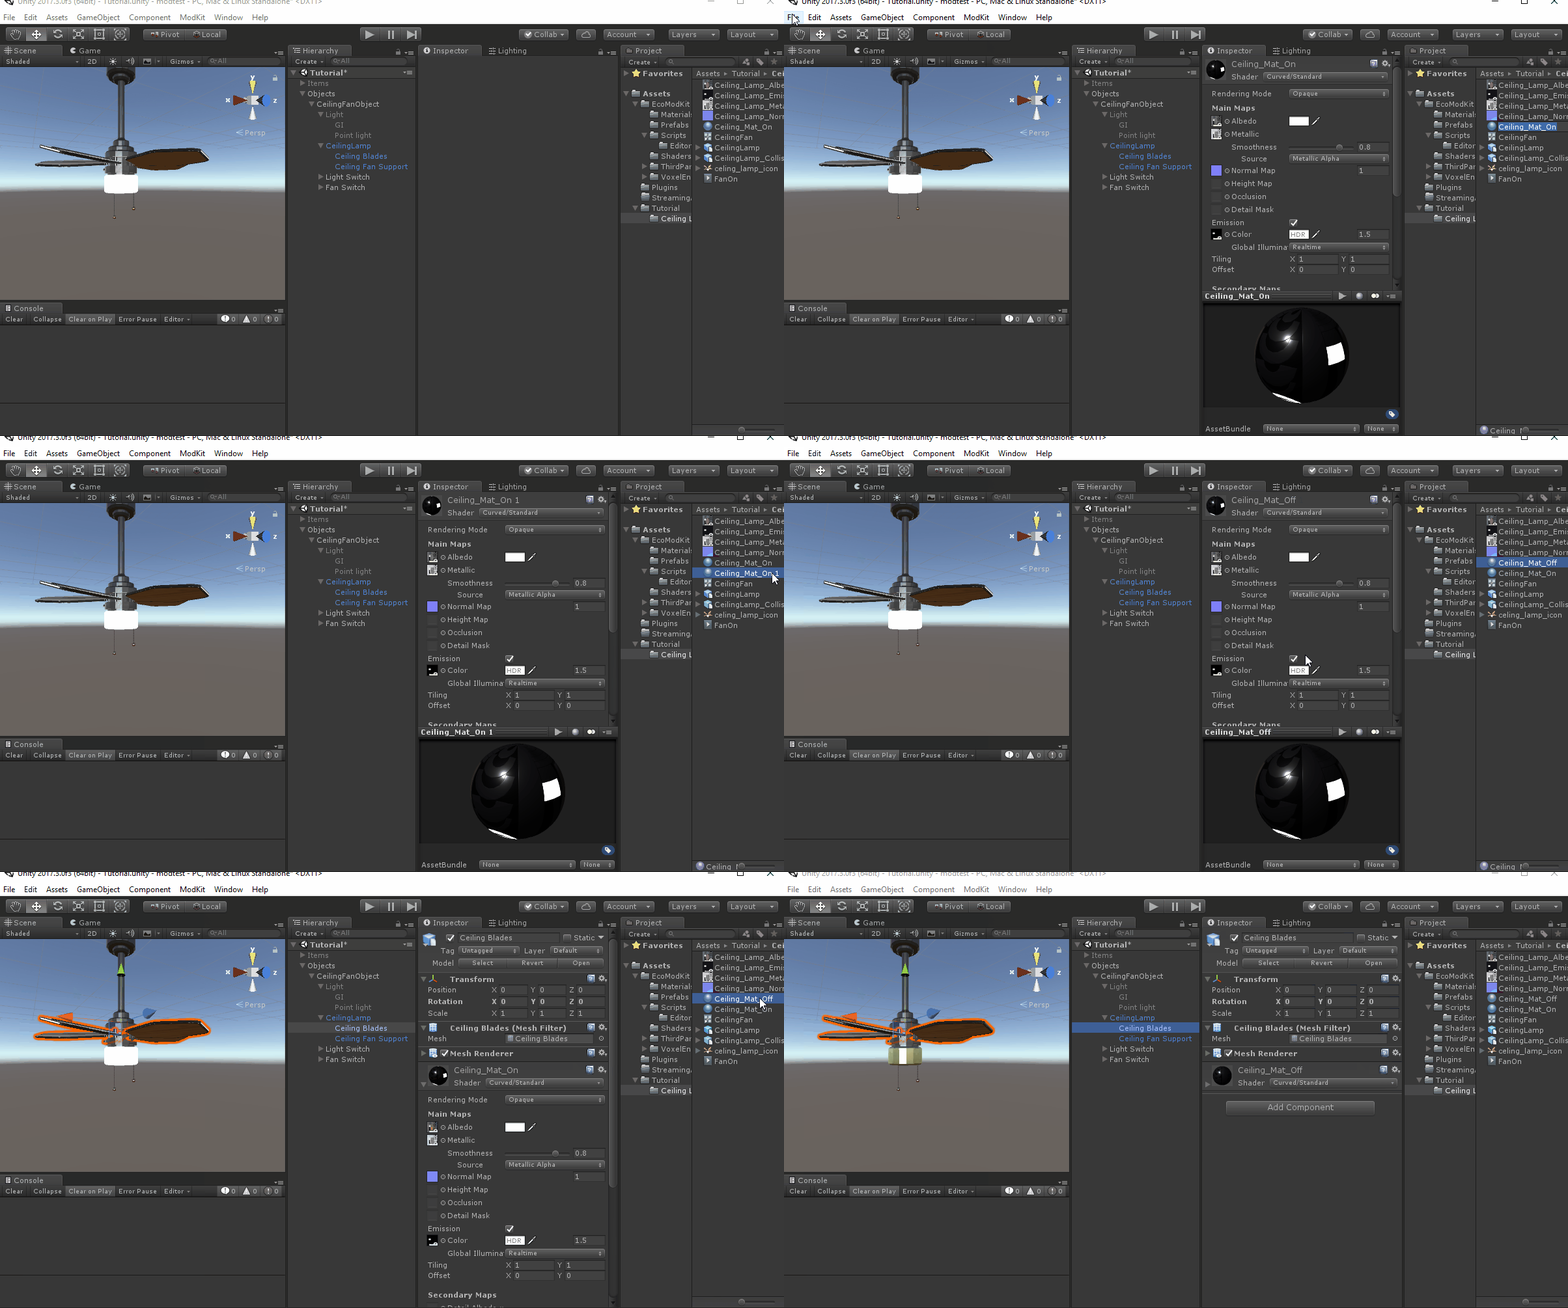
- Unity Event Setup
- We will be syncing the light by creating a new boolean state event named "Light" (matches the AnimationState set by the server script)
- Swap materials by dragging "Ceiling Fan Support" (which contains the light portion) into the Enabled/Disabled event slots and then selecting to override Renderer.sharedMaterial with our On/Off materials.

- Light & Global Illumination Setup
- Create a Point Light and add the EcoLight script, this enables the point light when GI is disabled
- Create a Sphere, assign it to layer "OnlyGI" and remove its collider
- Create a new material with a high emission property and assign it to the sphere. Also make sure it uses the curved/standard shader. (not shown in this gif)

- Unity Event Setup
- Disable the Light transform which contains our Point/GI lights so we don't get flickering if it spawns turned off
- Create a new entry in the Light boolean state event Changed event and set it to call GameObject.SetActive(bool) on our lights.

- You can test the Fan with ModKit -> Build Current Bundle then reconnect to the server. The fan should be fully functional!
- Custom-Chat-Commands
- Generic-Authorization
- Item-Callbacks
- Modifying-the-World
- Save-Load
- Reacting to player events
- Debugging store interactions
- Creating skills
- Maintain mods automatically
- Overriding Translations
- Creating UIs for Mods
See all pages (above) for reference & usage tutorials.
