-
Notifications
You must be signed in to change notification settings - Fork 5
/
Copy pathdigitrecognition.py
201 lines (146 loc) · 5.43 KB
/
digitrecognition.py
1
2
3
4
5
6
7
8
9
10
11
12
13
14
15
16
17
18
19
20
21
22
23
24
25
26
27
28
29
30
31
32
33
34
35
36
37
38
39
40
41
42
43
44
45
46
47
48
49
50
51
52
53
54
55
56
57
58
59
60
61
62
63
64
65
66
67
68
69
70
71
72
73
74
75
76
77
78
79
80
81
82
83
84
85
86
87
88
89
90
91
92
93
94
95
96
97
98
99
100
101
102
103
104
105
106
107
108
109
110
111
112
113
114
115
116
117
118
119
120
121
122
123
124
125
126
127
128
129
130
131
132
133
134
135
136
137
138
139
140
141
142
143
144
145
146
147
148
149
150
151
152
153
154
155
156
157
158
159
160
161
162
163
164
165
166
167
168
169
170
171
172
173
174
175
176
177
178
179
180
181
182
183
184
185
186
187
188
189
190
191
192
193
194
195
196
197
198
199
200
# -*- coding: utf-8 -*-
"""Copy of DigitRecognition.ipynb
Automatically generated by Colaboratory.
Original file is located at
https://colab.research.google.com/drive/1E2NzFRmxx57hb9DPIba0-8n3sOyo6Yds
#A simple convnet on the MNIST dataset
There are 70,000 images in MNIST dataset which are numbers from 0-9 having size 28 X 28 each.
Our gole is to create a Convolution Neural Network which can classify these images into one of these 10 classes CORRECTLY!
We will build it 7 EASY steps so, let's get started!!

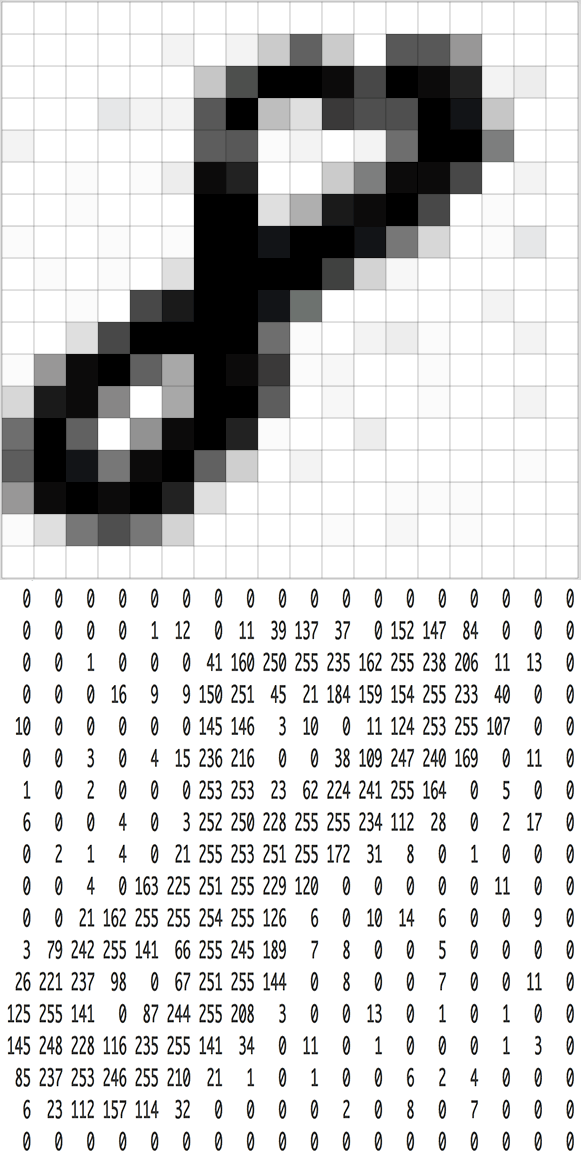
This is how Machine will read number 8

"""
# Import keras, tensorflow and some helpers
from __future__ import print_function
import keras
from keras.datasets import mnist
from keras.models import Sequential
from keras.layers import Dense, Dropout, Flatten, Activation
from keras.layers import Conv2D, MaxPooling2D
from keras import backend as K
import tensorflow as tf
import matplotlib.pyplot as plt
import matplotlib.image as mpimg
import numpy as np
import cv2
"""# STEP 1: Load image data from MNIST"""
# define parameters for NN
img_rows, img_cols = 28, 28
batch_size = 128
num_classes = 10
epochs = 12
# load data
(x_train, y_train), (x_test, y_test) = mnist.load_data()
# let's plot 4 images and their labels
plt.subplot(221)
plt.imshow(x_train[0], cmap=plt.get_cmap('gray'))
plt.title(y_train[0])
plt.subplot(222)
plt.imshow(x_train[1], cmap=plt.get_cmap('gray'))
plt.title(y_train[1])
plt.subplot(223)
plt.imshow(x_train[2], cmap=plt.get_cmap('gray'))
plt.title(y_train[2])
plt.subplot(224)
plt.imshow(x_train[3], cmap=plt.get_cmap('gray'))
plt.title(y_train[3])
plt.show()
"""# STEP 2: Preprocess input data for Keras
1. Reshape
2. Convert our data type to float32
3. Normalize our data values to the range [0, 1]
"""
print("shape of the image before reshaping it: ", x_train[0].shape)
if K.image_data_format() == 'channels_first':
x_train = x_train.reshape(x_train.shape[0], 1, img_rows, img_cols)
x_test = x_test.reshape(x_test.shape[0], 1, img_rows, img_cols)
input_shape = (1, img_rows, img_cols)
else:
x_train = x_train.reshape(x_train.shape[0], img_rows, img_cols, 1)
x_test = x_test.reshape(x_test.shape[0], img_rows, img_cols, 1)
input_shape = (img_rows, img_cols, 1)
print("shape of the image after reshaping it", x_train[0].shape)
x_train = x_train.astype('float32')
x_test = x_test.astype('float32')
x_train /= 255
x_test /= 255
"""# STEP 3: Preprocess class labels for Keras
One hot encoding

"""
y_train = keras.utils.to_categorical(y_train, num_classes)
y_test = keras.utils.to_categorical(y_test, num_classes)
"""# STEP 4: Define model architecture
# 
"""
# Keras automatically handles the connections between layers.
model = Sequential()
# number of kernel: 32 | Size: 3 X 3 | Activation function: Relu
model.add(Conv2D(32, kernel_size=(3, 3),
activation='relu',
input_shape=input_shape))
# add more layers
model.add(Conv2D(64, (3, 3), activation='relu'))
model.add(MaxPooling2D(pool_size=(2, 2)))
# regularizing our model in order to prevent overfitting
model.add(Dropout(0.25))
# fully connected layer (1-D)
model.add(Flatten())
model.add(Dense(128, activation='relu'))
model.add(Dropout(0.5))
# the final layer has an output size of 10, corresponding to the 10 classes of digits
model.add(Dense(num_classes, activation='softmax'))
print(model.summary())
"""# STEP 5: Compile model"""
model.compile(loss=keras.losses.categorical_crossentropy,
optimizer=keras.optimizers.Adadelta(),
metrics=['accuracy'])
"""# STEP 6: Fit model on 60k training and Validate it on 10k images"""
history = model.fit(x_train, y_train,
batch_size=batch_size,
epochs=epochs,
verbose=1,
validation_data=(x_test, y_test))
"""# STEP: 7 Evaluate model on test data"""
score = model.evaluate(x_test, y_test, verbose=0)
print('Test loss:', score[0])
print('Test accuracy:', score[1])
"""# Test it on own image!!
1. Create an image in paint
2. Upload it here
3. Pre-process it
4. Evaluate on our model
"""
import cv2
img = mpimg.imread('1.png') # read image
label = np.array([4]) # assign corect label to it
# plot input image and label
plt.imshow(img, cmap=plt.get_cmap('gray'))
plt.title(label)
# pre-process
img = cv2.resize(img,(28,28))
img = img[:,:,0]
img = img.reshape(1, 28, 28,1)
label = keras.utils.to_categorical(label, num_classes)
# evalute on our model
score = model.evaluate(img, label, verbose=0)
print('Test accuracy:', score[1])
pred = model.predict(img)
predicted = np.argmax(pred, axis=1)
print("Predicted Output: ", predicted)
"""# Visualization of Model Accuracy and Loss"""
plt.plot(history.history["acc"])
plt.plot(history.history["val_acc"])
plt.title("Model Accuracy")
plt.xlabel("Epoch")
plt.ylabel("Accuracy")
plt.legend(["train", "validation"], loc="upper left")
plt.show()
plt.plot(history.history["loss"])
plt.plot(history.history["val_loss"])
plt.title("Model Loss")
plt.xlabel("Epoch")
plt.ylabel("Loss")
plt.legend(["train", "validation"], loc="upper left")
plt.show()