As of HA core 2021.7.0 all functionlities of this integration are part of HA core. This custom integration is not maintained anymore, as a result. Thanks for suporting us with this custom integration.
This custom integration is now deprecated because is fully merged into HomeAssistant core.
Features:
- Switch between access profiles ("Zugangsprofile") for devices in your network
- Turn on/off call deflections ("Rufumleitung")
- Manage port forwardings for your Home Assistant device
- Turn on/off wifi and guest wifi
- Reconnect your FRITZ!Box / get new IP from provider
- Sensor for internet connectivity (with external IP and uptime attributes)
Install via HACS
The custom component is available via HACS
Manual Install
If you want to install the custom commponent manually, add the folder fritzbox_tools/ to YOUR_CONFIG_DIR/custom_components/.
If you're running on a manual HA install on eg. Debian or your own Docker setup, make sure to install the system requirements for fritzconnection (the library which is used by this component):
sudo apt-get install libxslt-dev
As Integration (recommended):
Go to the Integrations pane on your Home Assistant instance.
Using configuration.yml (legacy):
fritzbox_tools:
  devices:
    - host: "192.168.178.1"  # required
      username: "home-assistant"  # required (create one at `System > FRITZ!Box Benutzer` on your router)
      password: "yourfritzboxpassword"  # required
      profiles: # Optional. Needed if you want to control the profiles of your network devices.
        - "Gesperrt"
        - "Gast"
        - "Kinder Smartphones"
      use_wifi: True # Optional, default True: if False no wifi switches will be exposed
      use_port: True  # Optional, default True: if False no port switches will be exposed
      use_profiles: True  # Optional, default True: if False no device switches will be exposed, redundant if devices is not specified
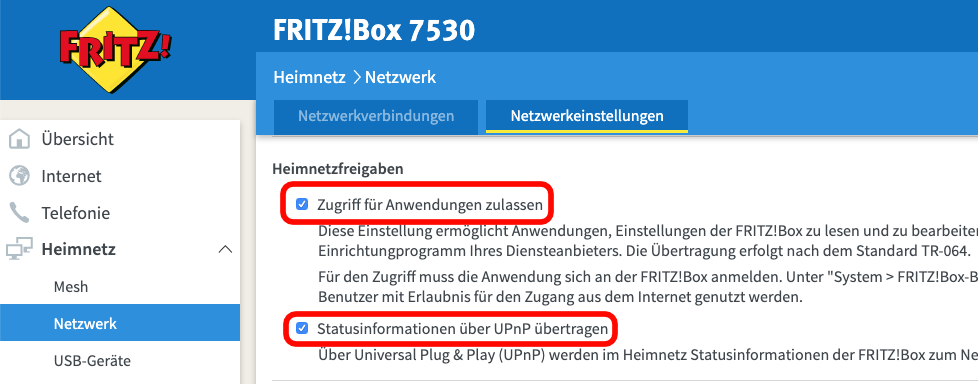
use_deflections: True # Optional, default True: if False no call deflection switches will be exposedIf you want to be able to control settings of the FRITZ!Box (eg. toggle access profiles, (guest) wifi, port forwards, ...), you need to enable two settings in the FRITZ!Box UI Home > Network > Network Settings (Tab) as seen in the following screenshot:
 Note that the option is only visible if you turn on the "advanced view" on your FRITZ!Box.
It's possible to enable/disable port forwardings for the device which is running Home Assistant.
Requirements:
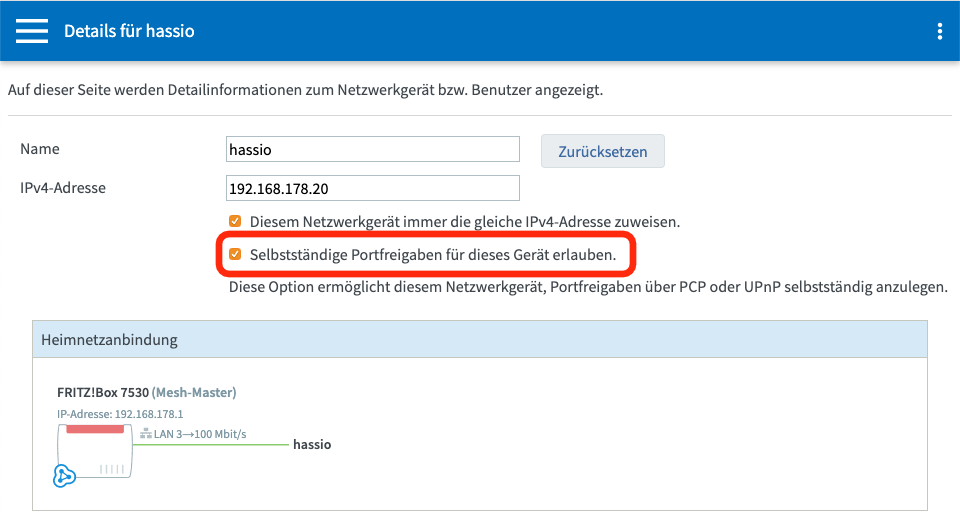
- On your FRITZ!Box, enable the setting
Selbstständige Portfreigaben für dieses Gerät erlauben.for the device which runs HA (s. next screenshot) - Only works if you have a dedicated IPv4 address (it won't work with DS-Lite)
The port forwards will be exposed as switches in your HA installation (search for port_forward in your entity page to find the IDs).
Note: Currently only port forwards for the device which is running HA are supported!
You can switch the online time of access profiles ("Zugangsprofile") within Home Assistant.
Requirements:
- In the FRITZ!Box: Create profiles and assign devices to those profiles.
- Add the (FRITZ!Box) names of the profiles you want to control to
profile_list.
The access profiles will be exposed as switches in your HA installation (search for fritzbox_profile in your entity page to find the IDs).
If the switch is toggled on, the devices assigned to the specific profile have internet access. If the switch is toggled off, the devices can not access the internet.
service.reconnectReconnect to your ISPservice.rebootReboot your FRITZ!Boxswitch.fritzbox_[model_wifi]Turns on/off wifiswitch.fritzbox_[model_wifi_5ghz]Turns on/off wifi (5GHz)switch.fritzbox_[model]_guest_wifiTurns on/off guest wifibinary_sensor.fritzbox_[model]_connectivityonline/offline depending on your internet connectionswitch.fritzbox_[model]_portforward_[description of your forward]for each of your port forwards for your HA deviceswitch.fritzbox_[model]_deflection_[if of your deflection]for each deflection you have set.switch.fritzbox_[model]_profile_[name of your profile]for each profile you have set
Script: Reconnect / get new IP
The following script can be used to easily add a reconnect button to your UI. If you want to reboot your fritzbox, you can use fritzbox_tools.reboot instead.
fritz_box_reconnect:
  alias: "Reconnect FRITZ!Box"
  sequence:
  - service: fritzbox_tools.reconnect
    data:
        host: 192.168.178.1
Automation: Reconnect / get new IP every night
automation:
- alias: "System: Reconnect FRITZ!Box"
  trigger:
    platform: time
    at: '05:00:00'
  action:
    - service: fritzbox_tools.reconnect
      data:
        host: 192.168.178.1
Automation: Phone notification with wifi credentials when guest wifi is created
The custom component registers a switch for controlling the guest wifi and a service for triggering a reconnect. I use the following automation to send the guest wifi password to my wife's and my phones whenever we turn on the guest wifi:
automation:
  - alias: "Guests Wifi Turned On -> Send Password To Phone
    trigger:
      platform: state
      entity_id: switch.fritzbox_[model]_guest_wifi
      to: 'on'
    action:
      - service: notify.pushbullet_max
        data:
          title: "Guest wifi is enabled"
          message: "Password: ..."
Automation: Open port 80 for the Let's Encrypt http challenge
If you're using the Let's Encrypt Addon you could create an automation for renewing your certificates automatically. However, the http challenge requires port 80 to be open on your router.
The following automation does three things:
- Open port 80 on the router (the port forward needs to be created manually first)
- Stop the NGINX proxy addon
- start the Let's Encrypt addon to perform the renew
- Close port 80
- Start NGINX addon again
automation:
  - alias: 'System: LetsEncrypt certificate renewal'
    trigger:
    - platform: time
      at: 05:00:00
    action:
    - service: switch.turn_on
      entity_id: switch.fritzbox_[model]_portforward_http_server
    - service: hassio.addon_stop
      data:
        addon: core_nginx_proxy
    - delay: 00:00:15
    - service: hassio.addon_restart
      data:
        addon: core_letsencrypt
    - delay: 00:03:00
    - service: hassio.addon_start
      data:
        addon: core_nginx_proxy
    - service: switch.turn_off
      entity_id: switch.fritzbox_[model]_portforward_http_server
Sensor: External IP address of your router The IP addresses (v4 and v6) are available as attributes of the connectivity sensor that this component exposes. However, if you want to have a dedicated sensor for your external IP, you can create a template sensor like this:
sensors:
  - platform: template
    sensors:
      external_ip:
        friendly_name: "External IP Address"
        entity_id: binary_sensor.fritzbox_[model]_connectivity  # only react on changes of the router connectivity sensor
        value_template: "{{ state_attr('binary_sensor.fritzbox_[model]_connectivity', 'external_ip') }}"
        icon_template: mdi:router-wireless
This will create you a sensor with the entity id sensor.external_ip.
- This project is based on
fritzconnection. Thanks @kbr for the hard work.


