-
Notifications
You must be signed in to change notification settings - Fork 6
Development
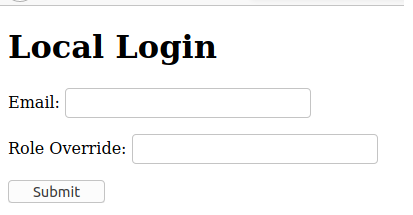
After starting the application in the 'local' environment, open up the website at . You should be immediately redirected to a bare bones login page. If you were not directed you may be logged in still (have an active token saved) from a previous session, to get forced to the login page you can go manually to or click on the profile icon, and select log out. Either way you will end up on the screen shown below.

You can type in any email in the email textbox. The email can be existing or made up on the spot. If it is existing, the local oauth detail mapper will use that entity as your authenticated user, else it will create a new user with this email and you will use that entity as your authenticated user.
For Role Override you have 5 options
- SUPER - Gives you all 3 roles [ADMIN, PDL, MEMBER]
- ADMIN - Gives you the admin role [ADMIN]
- PDL - Gives you the PDL role [PDL]
- MEMBER - Gives you the Member role [MEMBER]
- Leave it blank - You have no new role access given to you, but you are still authenticated. If this user already had role access, you will be granted those roles.
When you fill in the role override, the mapper will do a lookup similar to the table above and grant you each role that matches your entry. For example if you had written SUPER in the role override textbox, the user tied to the email you put in above would be granted all three roles. These roles will be persisted in the database. The reverse is also true, if you pick a different role, roles you already had on that user may be taken away. For example if you decide to login in with the same user above, but put in a role override of PDL instead of the SUPER we did last time, the user will lose the roles of ADMIN and MEMBER, but keep the PDL role.
Once hitting submit the above database logic and magic is carried out, your request will go through a fake OAuthController that will mimic an OAuth issuer, and return back a JWT to the client which they can use for 1 hour before being forced to log in again for a new token.
You will notice there is no authentication spot on the swagger_ui page, this is due to issues with not being able to control the state that is sent in through swagger. You still can use the swagger-ui locally, but your first step will be to do what we did above, and get logged in to receive a JWT. Once you are logged in and redirected to the home page, go to the swagger endpoint. You should be able to execute all the endpoints the role you chose to login with would provide you.
Run the backend with MICRONAUT_ENVIRONMENTS=local
In a console in the web-ui directory run npm start
Go to localhost:8080 in your browser.
Follow the steps above under How to authenticate locally to authenticate.
Go to localhost:3000 in your browser.