There are 3 contribution points:
- Theia
- Che-Theia extensions
- Che-Theia plugins
For each of these kinds of contribution, rebuilding the container image is not needed to code, build and test your contribution. We can create a Che workspace that would setup all the containers to build and run Che-Theia. The containers will rely on the same ones used in the CI for the Che-Theia container build. Building che-theia in the che-workspace would be very close to the one build by Docker.
You will find here few devfile that will help you in setting up theses environments
Each devfile could be run on any Che instances. Beware that each of them may need a certain amount of memory. Devfile could be launched through a factory or chectl cli.
$ chectl workspace:start -f devfiles/che-theia-all.devfile.yaml
Note that this devfile is going to evolve very soon and be splitted into multiple devfiles.
The devfile: <this.repo>/devfiles/che-theia-all.devfile.yaml
In this section, we show how to setup a Che 7 environment to work on che-theia, and how to use it. For the whole workflows, we will need a workspace with such containers:
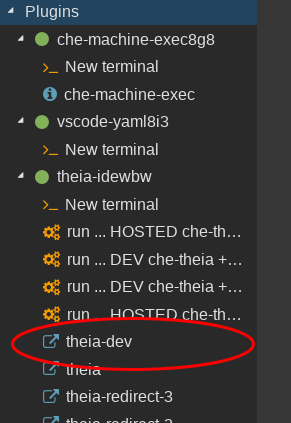
- Theia IDE (Editor) container (a.k.a theia-idexxx). It would have Theia editor with a set of plugins. It will also run the Theia instance for testing our development (theia-dev endpoint).
- Che-Theia Dev container (a.k.a che-dev). We will build the che-theia (theia + che-theia extensions) and plugins.
All containers have /projects folder mounted, which is shared among them.
Developer workflow:
- Start the workspace with the devfile, it is cloning Theia and the che-theia plugins.
- Setup Theia sources to include Che-theia extension thanks to
che:theia initcommand (Che-theia dev container) - ….. [ Code on theia or che-theia extension ]
- Build che-theia (theia + che-theia extensions) (Che-theia dev container)
- …...[ Code on the a plugin project ]
- Build the plugin project (Che-theia dev container)
- Run che-theia and will be configured to include the plugin. (Che-theia dev container or theia-ide container)
The following devfile provides examples of commands to build and run che-theia with factory and containers plugins.
In this section we are going to start a new workspace to work on che-theia. The new workspace will have few projects cloned: theia and che-theia. It will also setup the containers and commands in the My workspace view. We will use these commands in the next steps.
The devfile could be started using chectl:
chectl workspace:start -f https://raw.githubusercontent.com/eclipse/che-theia/master/devfiles/che-theia-all.devfile.yaml
At workspace start, Che will clone Theia and Che-theia.
In this section we are going to adapt Theia build so it creates an assembly with che-theia specific extensions.
You can use the che command init ... DEV che-theia (command pallette > Run task > … or containers view)
Basically, this command will perform:
[che-dev]
$ che:theia init --dev
This command will checkout all extensions in /projects/theia/che folder and create symbolic link into /projects/theia/packages folder.
By default, extensions list is retrieved from https://github.com/eclipse/che-theia/blob/master/che-theia-init-sources.yml
At this point you can code on che-theia extensions inside /projects/theia/che/che-theia/extensions folder. Extensions changes would be taken into account in the next step.
You can use the che command build ... DEV che-theia (command pallette > Run task > … or containers view)
Basically, this command will perform:
[che-dev]
$ yarn
$ che:theia production
yarnwill compile theia + additional Che-theia extensions that have been setted up byche:theia initche:theia productionwill generate a production like package.
At this stage, you can code on Che-theia plugins. In this devfile, containers and factory plugin are covered.
Che-theia plugins are located in /projects/che-theia/plugins/ folder.
You can use the che command build ... containers-plugin or build ... factory-plugin (command pallette > Run task > … or containers view)
Basically, this command will perform in the right plugin folder:
[che-dev]
$ yarn
yarn will compile the plugin and produce a .theia file which is the plugin itself.
In this section, we are going to run the che-theia assembly built previously and run that with one of the plugins built previously. We will be able to test our changes with a dedicated che-theia instance.
You can use the che command run ... DEV che-theia + factory-plugin or run ... DEV che-theia + containers-plugin (command pallette > Run task > … or containers view)
Basically, this command will start the DEV che-theia with the plugin:
[theia-ide]
$ export HOSTED_PLUGIN=/projects/che-theia/plugins/factory-plugin/
$ node /projects/theia/production/src-gen/backend/main.js /tmp/theiadev_projects --hostname=0.0.0.0 --port=3130
You can then access to your modified Che-theia from the Container view theia-dev endpoint

In this section we show how to run the che-theia assembly but in dev mode: keeping all the information for debugging.
You can use the che command run ... DEV yarn start ... che-theia + factory-plugin or
run ... DEV yarn start... che-theia + containers-plugin
(command pallette > Run task > … or containers view).
To start che-theia in dev-mode with yarn (not using the production che-theia generated). It would keep things like the ability to source map.
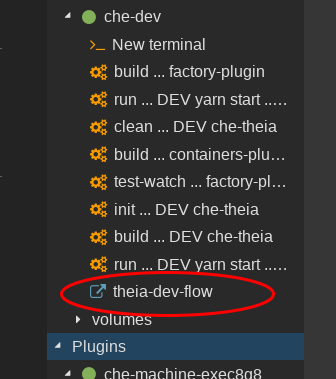
Running dev theia would be located in the che-dev container and theia-dev-flow endpoint:

If you do not have any changes on Theia or Che-theia extension, you could just build the plugins with build ... containers-plugin or build ... factory-plugin
and run these plugins with the existing che-theia app:
run ... HOSTED che-theia + container-plugin or run ... HOSTED che-theia + factory-plugin