-
Notifications
You must be signed in to change notification settings - Fork 4
✏️ 박명범_바코드에 대해서 알아보자!
바코드의 종류는 정말 많다... 이 사이트 참고

리니어 형태만 이 정도이고, 아래의 섹션 별로 엄청나게 많은 바코드 종류가 존재한다.


그 중 기프티콘에 사용되는 바코드는 Code-128 타입이다. 세계적으로 판매용 상품에 가장 많이 사용되는 타입이기도 하다.
ASCII 코드를 사용한다. 즉, 숫자+문자 조합 혹은 숫자만 등등 다양한 형태로 사용된다. (ASCII 코드가 128 비트로 돼 있어서 Code-128 이라는 이름이 붙은 듯)
7개의 섹션으로 구분된다
- Quite zone
- Start symbol
- Encoded data
- Check symbol (필수)
- Stop symbol
- Final bar (이걸 Stop symbol 로 보는 경우도 있다)
- Quite zone
이 중 4 번의 Check symbol 은 바코드를 검증하기 위해 사용되며 모든 symbol 들에 대해 (weighted sum % 103) 연산으로 검증된다.
바의 사이즈는 4단계로 구분된다
하나의 문자는 바 3개 + 공백 3개 로 표시한다

Start symbol(코드셋) 은 3 종류가 있다.
CODE-A,CODE-B,CODE-C. 이 종류에 따라 표시할 수 있는 문자가 달라진다
그리고 SHIFT 문자를 사용하면 바코드 중간에서 코드셋을 변경할 수도 있다. 특히 CODE-C 를 사용하면 하나의 단위에 2개의 숫자를 사용할 수 있어서 더 많은 정보를 한 번에 표현할 수도 있다
띄어쓰기도 바코드로 만들 수 있다
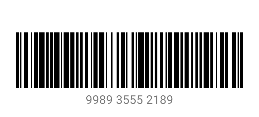
원본

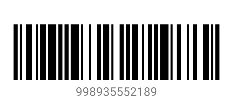
밑에 숫자에는 띄어쓰기가 포함되어 있다. 이 띄어쓰기가 포함된 바코드일까?
띄어쓰기 포함

띄어쓰기 미포함

비교를 해보면 띄어쓰기가 포함되지 않은 바코드와 일치하는 것을 알 수 있다. 우리도 띄어쓰기를 제외한 바코드를 만들고, 숫자를 보여줄 땐 4개씩 끊어서 보여주면 될 듯 하다
안드로이드에서 바코드를 생성하는 가장 쉬운 방법은 Zxing 라이브러리를 사용하는 것이다.
implementation 'com.google.zxing:core:3.5.1'삡에서는 BuildSrc 를 사용하고 있기 때문에 의존성 추가하는 부분은 위와 조금 달랐지만 프로젝트마다 적절히 추가하면 된다
Zxing 에서는 바코드를 생성한 결과를 Bitmap 으로 넘겨준다.
<?xml version="1.0" encoding="utf-8"?>
<resources>
    <dimen name="width_barcode">300dp</dimen>
    <dimen name="height_barcode">65dp</dimen>
</resources>
dimens.xml 파일에 위와 같이 크기를 지정했다.
- BitMatrix 객체 생성
barcodeValue: 바코드로 변환할 값
BarcodeFormat.CODE_128: 변환할 포맷
widthPixels, heightPixels: 생성할 크기
val bitMatrix = Code128Writer().encode(
    barcodeValue,
    BarcodeFormat.CODE_128,
    widthPixels,
    heightPixels
)
반환 값인 BitMatrix 는 2차원 배열로 Code128Writer().encode() 를 통해 바코드의 정보가 담겨서 넘어온다. 바코드의 정보란 해당 픽셀이 검은 색으로 칠해져야 하는 픽셀인지 아닌지에 대한 정보를 의미한다.
- 바코드 정보 배열에 저장하기
IntArray 에 Bitmap 에 칠할 색상 정보를 저장한다.
이때 2차원 배열이 아닌 1차원 배열을 사용한다
val pixels = IntArray(bitMatrix.width * bitMatrix.height)
for (y in 0 until bitMatrix.height) {
    val offset = y * bitMatrix.width
    for (x in 0 until bitMatrix.width) {
        pixels[offset + x] =
            if (bitMatrix.get(x, y)) barcodeColor else backgroundColor
    }
}
width x height 크기의 배열을 만들고, 위에서 만든 bitMatrix 의 정보에 따라서 색깔을 지정한다.
- 비트맵으로 만들기
val bitmap = Bitmap.createBitmap(
    bitMatrix.width,
    bitMatrix.height,
    Bitmap.Config.ARGB_8888
)
bitmap.setPixels(
    pixels,
    0,
    bitMatrix.width,
    0,
    0,
    bitMatrix.width,
    bitMatrix.height
)
bitMatrix 의 width x height 크기의 비트맵을 만들고, 위에서 만든 pixels 를 통해 비트맵을 만들어준다.
class BarcodeUtil @Inject constructor(@ApplicationContext val context: Context) {
    fun displayBitmap(imageView: ImageView, value: String) {
        val widthPixels = context.resources.getDimensionPixelSize(R.dimen.width_barcode)
        val heightPixels = context.resources.getDimensionPixelSize(R.dimen.height_barcode)

        imageView.setImageBitmap(
            createBarcodeBitmap(
                barcodeValue = value,
                barcodeColor = context.getColor(R.color.black),
                backgroundColor = context.getColor(android.R.color.white),
                widthPixels = widthPixels,
                heightPixels = heightPixels
            )
        )
    }

    fun createBarcodeBitmap(
        barcodeValue: String,
        @ColorInt barcodeColor: Int,
        @ColorInt backgroundColor: Int,
        widthPixels: Int,
        heightPixels: Int
    ): Bitmap {
        val bitMatrix = Code128Writer().encode(
            barcodeValue,
            BarcodeFormat.CODE_128,
            widthPixels,
            heightPixels
        )

        val pixels = IntArray(bitMatrix.width * bitMatrix.height)
        for (y in 0 until bitMatrix.height) {
            val offset = y * bitMatrix.width
            for (x in 0 until bitMatrix.width) {
                pixels[offset + x] =
                    if (bitMatrix.get(x, y)) barcodeColor else backgroundColor
            }
        }

        val bitmap = Bitmap.createBitmap(
            bitMatrix.width,
            bitMatrix.height,
            Bitmap.Config.ARGB_8888
        )
        bitmap.setPixels(
            pixels,
            0,
            bitMatrix.width,
            0,
            0,
            bitMatrix.width,
            bitMatrix.height
        )
        return bitmap
    }
}
Hilt 로 context 를 주입 받아서 사용하기 위해 어노테이션을 붙였고, displayBitmap 메서드의 첫 번째 인자로 ImageView 를 넘기면 해당 ImageView 에 이미지를 달아주는 동작을 하게 된다.
바코드로 만들어진 Bitmap 만을 얻고 싶다면 createBarcodeBitmap 메서드를 사용하면 된다.
- 안드로이드에서 지문 인증 하기!
- Firebase Google 로그인 세팅 중 겪은 오류
- 양탐정의 viewModelScope.launch 살인사건 수사일지
- 쉿! KeyStore과 Cipher
- WorkManager 알림과 위젯을 사용해보자!
- 애니메이션으로 삡에 숨결 불어넣기
- 리뷰어 등록을 자동으로 해보자
- Mockk을 활용한 테스트
- 검색 결과를 Room에 캐싱해보자!
- Room One to Many
- CustomException 과 Result를 적극 활용해보자!
- View의 Event를 처리하기 위한 상태 클래스를 만들어보자!
- WorkManager 알림과 위젯을 사용해보자!