This project builds off of the original throwie by Graffiti Research Labs (www.graffitiresearchlab.com), and the subsequent development of the morse code throwie using the ATTINY (http://www.instructables.com/id/Throwduino-Basic-Light-Sensing-Flashing-Throwie-/). Our morse code blinks out the names of fruits in Morse code. Use Ultraviolet LEDs to attract bees.
A lot more work could be done to make this code lighter. We welcome development!
What's needed:
- Arduino or ATTiny programmer (Sparkfun sells one)
- ATTiny85 (45 okay with some adjustments)
- LEDs - we use Ultraviolet LEDs
- Lithium coin cell battery
- perf board for circuit, or custom designed circuit
- electrical wire
optional:
- toggle switch
- 270 or 330 resistor
To begin:
- Make sure the Arduino programming environment is version 1.6.0 or above
- In Arduino> Preferences, add the David Mellis attiny to boards manager URLs
- Note: you might need to update boards.txt, manually writing in attiny45usbtinyisp.buildboard = COTE_ATTINY45USBTINYISP, etc.
- Hook up your Arduino microcontroller, and run Arduino ISP from File> Examples
- In the Tools menu, the board is set to "Arduino/ Genuino Uno", port is set to Arduino/ Uno, and the Programmer is AVR ISP
- This is establishing the Arduino as a programmer for our ATTIny
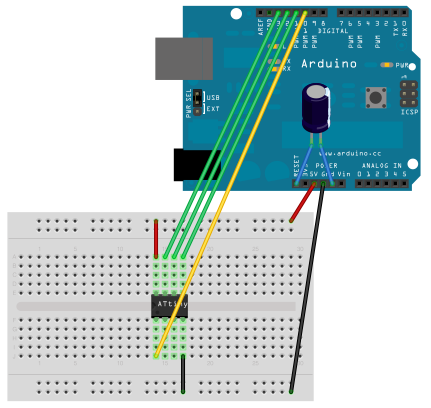
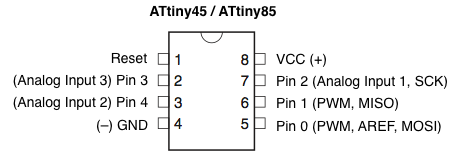
- Next, set up your ATTiny 85 on a breadboard. Schematic and image: From High Low Tech's Arduino board as ATtiny programmer article
From High Low Tech's Programming an ATtiny w/ Arduino 1.6 (or 1.0) article
- pins:
    - ATtiny Pin 2 to Arduino Pin 13
    - ATtiny Pin 1 to Arduino Pin 12
    - ATtiny Pin 0 to Arduino Pin 11
    - ATtiny Reset Pin to Arduino Pin 10
-
Restart the Arduino code environment
-
In Tools> set the Board to ATTiny 25/45/85; Processor: ATTiny 85; Clock: Internal 1Mhz; Programmer: Arduino as ISP
-
Run "Blink" from File>Examples>Basics -- Change pin 13 to pin 0.
-
If blink is working, then we can now upload our morse code arduino code (above)
-
The basic schematic for the morse code throwie is here. I've also shared the eagle schematic and pcb design as a demonstration of how a creative design could be implemented using othermill.
(Othermill can't handle these sharp lines, but hopefully will someday... this could be painted using conductive paint, or...)


