-
Notifications
You must be signed in to change notification settings - Fork 0
BookFederationTutorial_Part2
This tutorial continues the first part of the two series of BookFederation tutorial. Previously, we have shown you how to integrate two databases and create a virtual database (VDB) and make it cooperate with the OBDA plugin. In this tutorial, we are going to extend the VDB by adding another data source coming from a text file. We are going to add prices to the books that are sold by the store. And the price list is saved in a CSV file as an external source.
Before we start, download the text file for this tutorial and save it to your file system (e.g., JBOSS_PATH/server/default/data/teiid/bookprices/). It is important to create a new folder to keep the text file. And indeed, you may have more than one files there. However, all the text files must have the same columns structure in one directory.
These steps will show you how to create a metadata model for the text file using Teiid Designer plugin in Eclipse. Notice that we are not going to use the "Import" action as in the first tutorial but instead we are going to use the "New" action.
- Select File > New > Teiid Metadata Model action from the main menu.
- Fill the parameters:
- Model Name = "bookprices"
- Model Class = "Relational"
- Model Type = "Source Model"
- Model Builder = "Generate File Translator Procedures"
- Select Next .
- Accept all the options and select Finish . You should see a new metadata model "bookprices.xmi" in the Model Explorer.
- Save it.
- Select "bookprices.xmi" in the Model Explorer.
- Do a right click and then select Modelling > Set Connection Profile.
- Select **New...**.

- Select "Flat File Data Source" and type "bookprices" in the Name field.
- Locate the directory of the text file (e.g., JBOSS_PATH/server/default/data/teiid/bookprices/). Select Finish to go back to the parent window.
- Select OK to close the window.
- Again, do a right-click and select Modelling > Create Data Source.
- Type "bookprices-file" in the Data Source Name field.
- Select Use Model Connection Info option and select "bookprices" as the Source Model (we created this in step 1-5).
- Go to the JBOSS_PATH/server/default/deploy directory and you should see a new file "bookprices-file-ds.xml" has been created. Or, go to Teiid View panel and select Reconnect. A new entry "bookprices-file" will appear in the Data Sources folder.
After we have the metadata and deploy the data source, it's time to extend our VDB.
- Open "bookselling.vdb" in the Model Explorer.
- Select the Add icon.
- Locate the "bookprices.xmi" in the Project Explorer. Select OK and a new row entry is added to the VDB.
- Make sure the Translator is "file" and rename the JNDI Name to "bookprices-file" (this should follow the data source name).
- Save the VDB.
Before we start redeploying the new VDB, we need to activate the file connection (it doesn't go automatically as in JDBC case).
- Go to "Database Designer" perspective. If you don't see this perspective at the corner top-right, select Window > Open Perspective > Other... in the main menu and then select "Database Development". Select OK .
- Select ODA Data Sources > Flat File Data Source > bookprices in the Data Source Explorer. Do a right-click and select Connect .
- Select "bookselling.vdb" in the Model Explorer.
- Do a right-click and select Modelling > Execute VDB. Note : If any error message appears, try to undeploy the old VDB and repeat these steps.
Once the deployment succeed, Eclipse will automatically switch to "Database Development" perspective. And similar to the first tutorial, select Open SQL Scrapbook and enter this example query:
select price.* from (call bookprices.getTextFiles('*.csv')) f,
TEXTTABLE(f.file COLUMNS book integer, price double HEADER) price
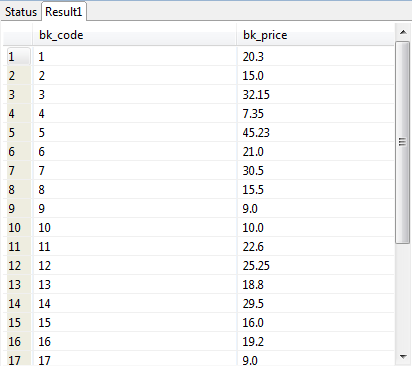
Execute the query and you should get the result as shown in the image below.

If you observe the query string, it is cluttered with the data organization inside the file. We can hide this information and simplify the query by creating a view in the VDB.
- Create a new metadata: File > New > Teiid Metadata Model.
- Fill the parameters:
- Model Name = "bookprices_view"
- Model Class = "Relational"
- Model Type = "View Model"
- Select Finish and save it.
- Select the new metadata "bookprices_view.xmi" and select New Child > Base Table action. Name the table "tb_prices".
- Create three new columns: New Child > Column
- bk_code:int
- bk_price:double

- Double-click the table to open the "Transformation Editor" and type:
SELECT
  price.book AS bk_code, price.price AS bk_price
FROM
  (EXEC bookprices.getTextFiles('*.csv')) AS f, TEXTTABLE(f.file COLUMNS book integer, price double HEADER) AS price
- Save the view.
- Add the view to "bookselling.vdb" and redeploy it.
- Now, do the query again but this time type:
select * from tb_prices
You should get the same result as in the previous.
We are going to leave this part as your exercise :) Here's a todo list to remind you:
- Extend the ontology. Hint : You just need to add one data properties called "price".
- Develop some new mappings.
- Create the queries.
BookFederation-part2_Final.zip: contains an example work.
- Quick Start Guide
- Easy-Tutorials
- More Tutorials
- Examples
- FAQ
- Using Ontop
- Learning more
- Troubleshooting
- Developer Guides
- Links