-
Notifications
You must be signed in to change notification settings - Fork 18
CodeRADViews
CodeRAD views are written using XML, and are converted into Java classes by the CodeRAD annotation processor. View XML files are placed in the common/src/main/rad/views directory of a Codename One Maven project, following the standard Java rules for package hierarchy.
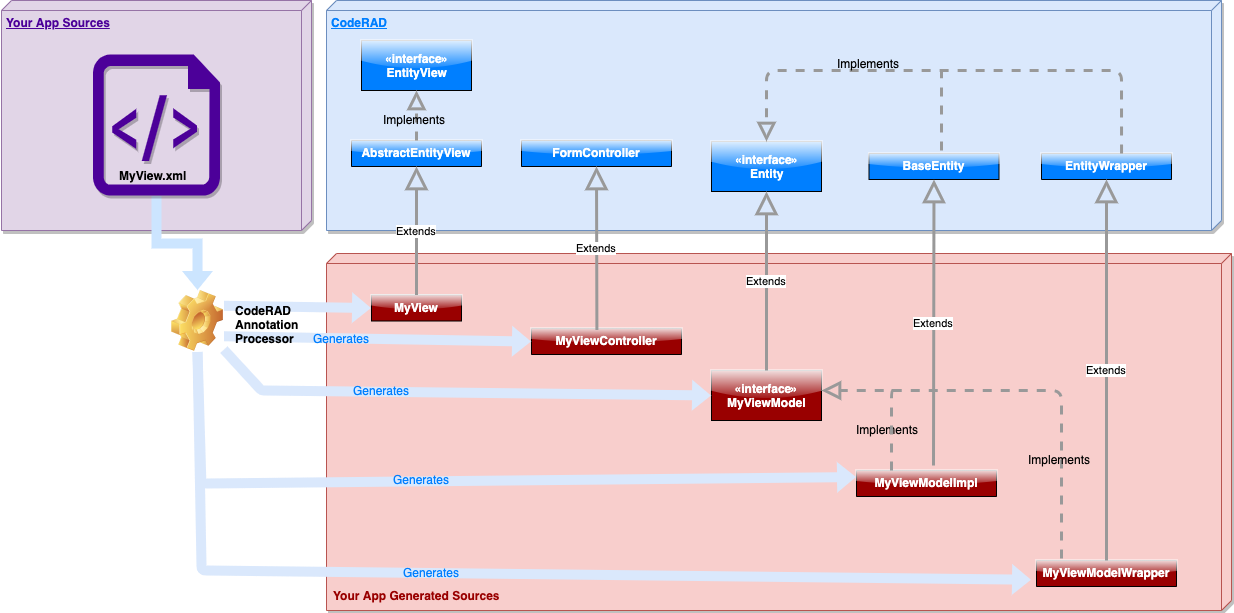
E.g. To create a view "MyView" in the "com.example.views", package, you would create a file named "MyView.xml" inside the common/src/main/rad/views/com/example/views directory. This view will automatically be converted into a Java View class (i.e. extending AbstractEntityView) by the CodeRAD annotation processor whenever the project is compiled.
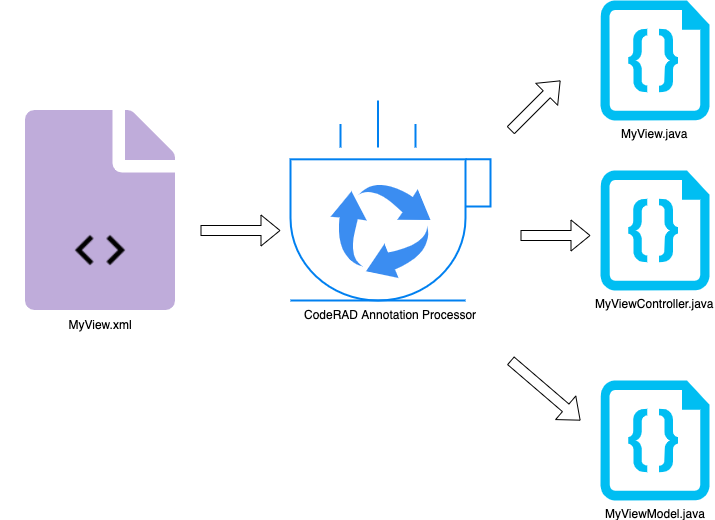
A very basic "Hello World" view would look like:
<?xml version="1.0"?>
<y> (1)
    <title>Hello World</title> (2)
    <label>Hello World</label> (3)
</y>-
Creates a Container with
BoxLayout.Ylayout. -
Sets the title of the form to "Hello World", if this view is used as the main content of a Form.
-
Places a
Labelwith text "Hello World" on the form.
Suppose this view is in the file com/example/views/MyView.xml (inside the common/src/main/rad/views directory), then, when you build the project, the CodeRAD annotation processor will process it and convert it into 3 Java classes:
- MyView
-
A View class extending
com.codename1.rad.ui.entityviews.AbstractEntityView. - MyViewController
-
A
FormControllerthat can be used for displaying this view in a Form. - MyViewModel
-
A CodeRAD model that is used for the view’s model. In this case, the view didn’t include any
<define-tag>tags, so the model would not contain any properties. Note that the annotation processor would further generate two concrete implementations ofMyViewModel:MyViewModelImpl, andMyViewModelWrapper. See Models for more information about these.
|
Tip
|
You can view the Java source that is generated in the common/target/generated-sources/annotations directory. When debugging, you can add break-points in this code just like any other Java source file. |
If you wanted to display this view from Java code you could use the MyViewController class as follows:
new MyViewController(parentController).show();|
Note
|
The parentController reference we pass to the MyViewController constructor can either be the Application controller instance, if the form should be "top-level" and include no back button, or another FormController that will be treated as the form’s parent. See Controllers for more details about the Controller hierarchy.
|
With CodeRAD XML, you have access to any Component in the your app’s classpath. To create a component, just add a tag with its simple classname. E.g. To create a TextField component, you could use the <textField> tag.
|
Tip
|
Tag names are case-insensitive, though the convention is to use camel-case with the first character in lower case. |
Question(s): How does the view know that the <textField> tag should generate an instance of com.codename1.ui.TextField and not com.example.xyz.TextField? If you implement your own widget in com.example.myapp.widgets.MyWidget, how will the compiler know to use this class for instantiating the <myWidget> tag?
Answer(s): RAD views support java-compatible import statements help resolve the tag names to their fully-qualified component class names. There are a few packages that are imported by default, such as com.codename1.ui, com.codename1.rad.ui, com.codename1.rad.ui.entityviews, and a few more key packages. To use components that are defined in other packages, you would need to add an import statement to your view.
Import statements should be placed inside an <import> tag inside the root XML tag of the view. For example:
<?xml version="1.0"?>
<y>
    <import>
        import com.example.myapp.widgets.*;
    </import>

    <myWidget/>
</y>
For the above example, assume that you have created a custom component at com.example.myapp.widgets.MyWidget. The <myWidget/> tag would instantiate this class because of the import statement.
|
Tip
|
import statements are placed verbatim into the resulting Java view class, so they are also helpful for using classes inside your view’s attributes and <script> tags also.
|
Component properties are set using XML tag attributes and Java bean naming conventions. E.g. If the component class has a single-arg method named "setName()", then we say that the component has a "name" property, and it can be specified in XML by setting the "name" attribute.
e.g.
<textField name="UsernameField"/>is roughly equivalent to the Java:
TextField textField = new TextField();
textField.setName("UsernameField");When creating components, sometimes you need to set properties of "sub"-components. For example, you might be wondering how to do the following in XML:
// Set foreground color to red
textField.getStyle().setFgColor(0xff0000);
The equivalent XML of this is:
<textField style.fgColor="0xff0000"/>|
Tip
|
Sub-properties are set with null-safety, so that if an intermediate part for the chain is null, it will fail silently. E.g. With the style.fgColor example, if getStyle() was null, then it wouldn’t set the fgColor, but it also wouldn’t throw a NullPointerException. It would check that the style is non-null first, before calling setFgColor() on it.
|
Attribute values will either be interpreted as String literals, or a Java expressions, depending on the property type. You can provide an optional prefix to explicitly declare that the value should be interpreted in a different way than the default. E.g. The "string:" prefix explicitly tells the processor to treat the value as a string literal. The "java:" prefix will cause it to interpreted as a Java expression.
For attributes of type java.lang.String, the default interpretation is as a string literal. For all other attributes, the default interpretation is as a Java expression.
To continue the above TextField example, name="MyTextField" translates to tf.setName("MyTextField"), meaning that it iterpreted "MyTextField" as a string literal - because the setName() method parameter type is a java.lang.String.
The style.fgColor="0xff0000" attribute is interpreted as a Java expression because setFgColor() takes an int as an argument.
Some Examples:
Assume these attributes are added to the <textField> tag (in the XML column) and called on the TextField class (in the Java column).
| XML | Java |
|---|---|
|
|
|
|
|
|
|
|
|
|
|
|
The above examples all involved single values, but, when the value is interpreted as a Java expression, you can use any valid Java expression.
E.g.
<textField preferredW="CN.getDisplayWidth()/2"/>is perfectly fine, and will set the preferredW property to half the display width.
When setting an "int" property, you can specify the value with one of the following units, and it will automatically convert the value to the appropriate number of pixels at runtime.
Some examples using units to set the preferredW property.
| XML | Description |
|---|---|
|
50 percent of the display width in pixels. |
|
50 percent of the dislay height in pixels. |
|
Padding top set to default font’s line height in pixels. |
|
Bottom margin set to 2 millimeters. |
|
Bottom margin set to 2 pixels. |
When setting the value of an enum property, you can simply specify enum value you want to set.
For example, suppose you have:
// An enum definition
public enum Color {
    Red,
    Green,
    Blue
}

// A Component that has a Color property:
public class MyComponent extends Component {
    /// ...

    public void setColor(Color color) {
        //...
    }
}
Then you could do the following in your XML view:
<myComponent color="Red"/>And this would be equivalent to the Java:
MyComponent cmp = new MyComponent();
cmp.setColor(Color.Red);When setting an com.codename1.ui.Image property, you can specify the attribute value as an http://.. URL, in which case it will set the property to an instance of URLImage that loads the image at that URL. When doing this, you can also append properties to the URL after a space, to set things like the image width, height, aspect ratio, and fill options.
Examples:
<!-- Image with width 90% of screen width, and 1:1 aspect ratio -->
<label icon="https://example.com/myimage.png width:90vw; aspect:1.0"/>

<!-- Image with a circle mask, and width 50% of screen width -->
<label icon="https://example.com/myimage.png mask:circle;width:50vw"/>

<!-- Image with roundrect mask, and 50% of screen width -->
<label icon="https://example.com/myimage.png mask:roundrect;width:50vw"/>

<!-- Image loaded from resources (via jar:// url) With circle
    mask, 50% width, and scaled to fill the images bounds -->
<label icon="jar:///chromebook.jpg width:50vw; scale:fill; mask:circle"/>When using "http://" URLs to specify an image, you can provide the following settings along with the URL as key-value pairs, as shown in the above examples. The possible settings are:
- width
-
The width of the placeholder image. Can be specified in scalar units such as
vh,vw,vmin,vmax,rem, andmm. - height
-
The height of the placeholder image. Can be specified in scalar units such as
vh,vw,vmin,vmax,rem, andmm. - aspect
-
The aspect ratio of the placeholder image. A double value representing the
w:haspect ratio. - scale
-
The scale settings for the image. Possible values include
none,fit, andfill. - mask
-
The mask settings for the image (whether to apply a mask). Possible values are
circle,roundrect, andnone.
When setting properties of type String[], you can provide the attribute value as a comma-delimited list of strings if you prefix it with "csv:".
E.g.
<label>Pick a color</label>
<picker strings="csv:Red, Green, Blue" />
This would be equivalent to the Java:
Picker cmp = new Picker();
cmp.setStrings(new String[]{"Red", "Green", "Blue"});In order to realize the full potential of CodeRAD views, you need to bind the view to a view model. A view model is automatically generated for each view by the annotation processor, but by default, the model doesn’t contain any properties. You can add properties to the view model via the <define-tag> tag, which will define a "Tag", and create a property in the view model with this tag. You can then bind UI elements to this tag.
For example, consider the following view:
<?xml version="1.0"?>
<y>
    <title>Login</title>
    <define-tag name="username" value="Person.identifier"/>
    <define-tag name="password"/>
    <define-tag name="rememberMe" type="boolean"/>

    <label>Username</label>
    <radTextField tag="username"/>

    <label>Password</label>
    <radTextField tag="password"/>

    <label>Remember me?</label>
    <radCheckBox tag="rememberMe"/>
</y>
The above view would generate the following set of classes:
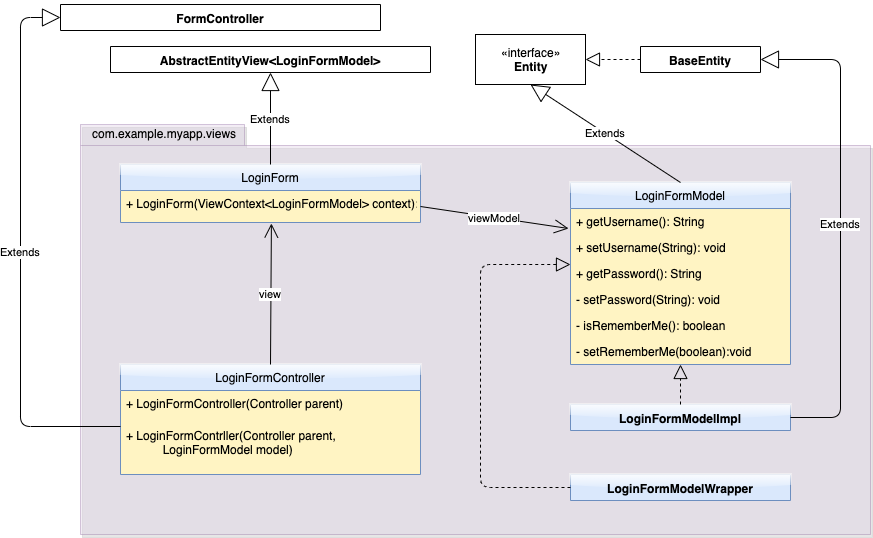
The LoginFormModel is the expected model class format for this view, although you can substitute any "compatible" model, whose properties have the same tags as the LoginFormModel.
The LoginFormController class is a convenience class for displaying the LoginForm view inside its own form. To display the LoginForm in this way, you could call:
new LoginFormController(parentController).show();Behind the scenes, this controller would construct a LoginForm view with an empty LoginFormModel instance as the model.
You could also explicitly construct your own LoginFormModel, and pass it as the second argument of the constructor.
LoginFormModel viewModel = new LoginFormModelImpl();
viewModel.setUsername("Steve");
viewModel.setPassword("MyPass555");
viewModel.setRememberMe(true);
new LoginFormController(parentController, viewModel).show();In some cases, you already have an Entity class and you want to design a view for it. In this case, you don’t need the view to generate its own view model, you just want it to work with your existing class. For this scenario, you would add the rad-model attribute to the root XML tag in your view.
e.g.
<?xml version="1.0" ?>
<y rad-model="com.example.myapp.models.UserProfile">
    <title>User Profile</title>

    <!-- ... the rest of your view here -->
</y>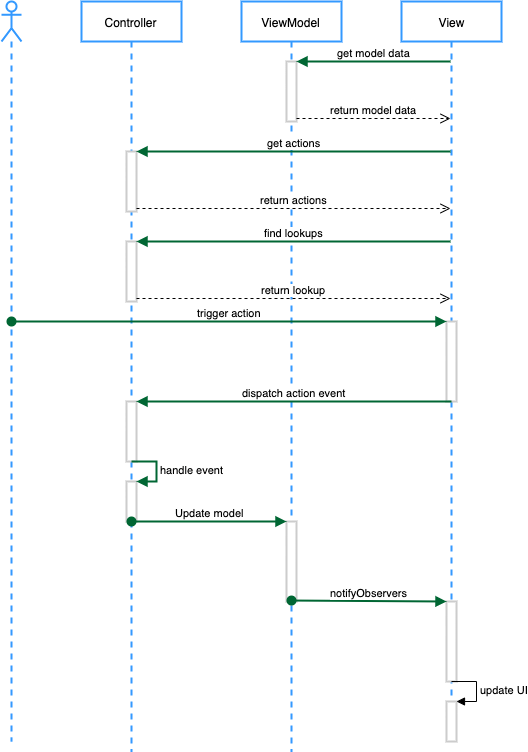
Setting a component property via its corresponding XML attribute will initialize the property value at the time that the view is created. For example, consider the following <textField> tag.
<textField text="java:context.getEntity().getUsername()"/>|
Tip
|
context.getEntity() gets a reference to the view model.
|
The text of this TextField will be set to the username of the view model when it is first created. But if the username of the model changes later on, the textfield won’t be updated - it will keep the original value.
You can prefix "bind-" to the attribute name cause the property to be re-evaluated whenever the model changes. Change the snippet to the following to achieve this result:
<textField bind-text="java:context.getEntity().getUsername()"/>Now, the text field text will be updated to the model’s username whenever it changes.
|
Tip
|
This binding is only a one-way binding. I.e. When the model value changes, the TextField will be updated, but the reverse is not true. Entering text in the TextField will not automatically update the model. If you need a two-way binding on a TextField, you should use the <radTextField> tag instead.
|
Bindings can be added to any property. For example, the following binding will change the color of the text to red when the username is longer than 8 characters:
<textField bind-style.fgColor="java:(context.getEntity().getUsername() == null || context.getEntity().getUsername().length() <= 8) ? 0x0 : 0xff0000"/>|
Tip
|
You can simplify the above expression using RAD macros as follows: <textField bind-style.fgColor="java:(${username}.text.length() <= 8) ? 0x0 : 0xff0000"/> |
It is common to need to access properties of the view model throughout the view. E.g. in attributes, <script> tags, and bindings. The default syntax for this can feel overly-verbose and cumbersome. For example, to access the username property of the view model you would need to do:
context.getEntity().getUsername()And this expression might resolve to null if the username property hasn’t been set on the model. A null-safe version would be:
context.getEntity().getText(username, "")As a short-hand alternative, you can also use RAD macros to access properties. The above snippet is equivalent to:
${username}.textThis is much shorter and easier to read. You can use macros inside both your java expressions, and strings. For example the following snippet uses the username property in a few different contexts:
<?xml version="1.0" ?>
<y>
    <define-tag name="username"/>

    <spanLabel>Hello ${username}.text</spanLabel>

    <textField bind-style.fgColor="java:(${username}.text.length() <= 8) ? 0x0 : 0xff0000"/>

    <script>
        if (${username}.text.length() > 0) {
            System.out.println("Username length is " + ${username}.text.length());
        }
    </script>
</y>
The .text suffix to the macro specifies that we want to get the property as a String. The following table shows the available suffixes, the java equivalent, and the return type:
| Macro | Equivalent | Return type |
|---|---|---|
|
|
|
|
|
|
|
|
|
|
|
|
|
|
|
|
|
|
|
|
|
|
|
|
When component properties are changed as the result of a binding, the default behaviour is to revalidate the view instantly. In some cases, this may be jarring to the user. For example, consider the following binding:
<label bind-hidden="java:${errorMessage}.isEmpty()"
    bind-text="java:${errorMessage}.text"
/>
In this case, if the errorMessage property of the view model is set to a non-empty String, it will result in the label being shown. If the errorMessage of the model is changed to the empty string or null, then the label will be hidden. In the case where the label is transitioning from being hidden to being visible, it would be better if it transitioned into being, rather than just appearing. Especially since its presence may affect the layout of the rest of the form (e.g. if may push components down that are rendered below it on the form).
We can achieve a smooth transition using the rad-transition attribute as follows:
<label bind-hidden="java:${errorMessage}.isEmpty()"
    bind-text="java:${errorMessage}.text"
    rad-transition="hidden 0.3s"
/>
In the example, the label would transition "in" over 0.3 seconds when it is shown, and it would transition "out" over 0.3 seconds when it is hidden.
You can specify the transitions of multiple properties delimited with commas. E.g.
<label ...
    rad-transition="hidden 0.3s, uiid 200ms, style.fgColor 0.2s, etc..."
/>|
Tip
|
The rad-transition attribute can also be used in conjunction with the rad-href attribute to specify the transition when navigating to a different view.
|
CodeRAD allows you to add "links" to other views via the rad-href attribute, which can be added to the <button>, <multiButton>, or any other component that implements the addActionListener(ActionListener) method.
Consider an app where you have three views: StartPage, AboutPage, and LoginPage. We can add a link from StartPage to About page with the following button:
<button rad-href="#AboutPage">Go to About Page</button>When the user presses this button, they will navigate to a new form with the AboutPage view as its contents.
When navigating to a new form, in CodeRAD, you need to be aware of the navigation hierarchy you are creating. For example, should the new form be a "child" of the current form, a "sibling" of the current form, or a top-level form. The most obvious difference is that a "child" form will include a "back" button back to the current form. A "sibling"'s back button will go to "parent" of the current form.
You can specify the navigation context by adding one of "child", "sibling", or "top" after the view name in the rad-href attribute as follows:
<!-- Navigate to about page as a "child" form
    (The default context is "child")
-->
<button rad-href="#AboutPage">Go to About Page</button>

<!-- Also Navigate to about page as a "child" form -->
<button rad-href="#AboutPage child">Go to About Page</button>

<!-- Navigate to about page as a "sibling" form -->
<button rad-href="#AboutPage sibling">Go to About Page</button>

<!-- Navigate to about page as a top level form
    with no "back" button -->
<button rad-href="#AboutPage top">Go to About Page</button>

<!-- Navigate to about page as a top level form of the
    current app section (only if using AppSectionController)
-->
<button rad-href="#AboutPage section">Go to About Page</button>The default behaviour of rad-href is to navigate to a new form. However, it is also possible to load the target view into a container on the current form, or to display it inside a Sheet.
The following example, uses a SplitPane where buttons in the left pane cause content to be loaded into the right pane.
<?xml version="1.0"?>
<splitPane xsi:noNamespaceSchemaLocation="IFrameSample.xsd" xmlns:xsi="http://www.w3.org/2001/XMLSchema-instance">
    <title>IFrame Sample</title>
    <y>
        <button rad-href="#StartPage sel:#Center" rad-transition="rad-href 1s flip">Start Page</button>
        <button rad-href="#BindingsPage sel:#Center" rad-transition="rad-href 1s flip">Bindings Page (Flip)</button>
        <button rad-href="#BindingsPage sel:#Center" rad-transition="rad-href 1s slide">Bindings Page (Slide)</button>
        <button rad-href="#BindingsPage sel:#Center" rad-transition="rad-href 1s cover">Bindings Page (Cover)</button>
        <button rad-href="#BindingsPage sel:#Center" rad-transition="rad-href 1s fade">Bindings Page (Fade)</button>
        <button rad-href="#BindingsPage sel:#Center" rad-transition="rad-href 1s uncover">Bindings Page (Uncover)</button>
        <button rad-href="#IFrameSample sel:#Center" rad-transition="rad-href 1s flip">IFrame Sample Page</button>
        <button rad-href="#CustomViewControllerSample sel:#Center" rad-transition="rad-href 1s flip">Custom View Controller</button>

    </y>
    <border name="Center">
        <label layout-constraint="center">Placeholder for content</label>

    </border>
</splitPane>|
Tip
|
This snippet also demonstrates the use of the rad-transition attribute to select a transition for displaying the content.
|
In this case, rather than specifying the target of the rad-href attribute as "child", or "sibling", or "top", we use "sel:#Center", which references the <border name="Center"> tag in the right panel of hte split pane.
The general rule is that if the target is prefixed with "sel:", then the remainder of the target is interpreted as a ComponentSelector query, which is similar to a CSS selector.
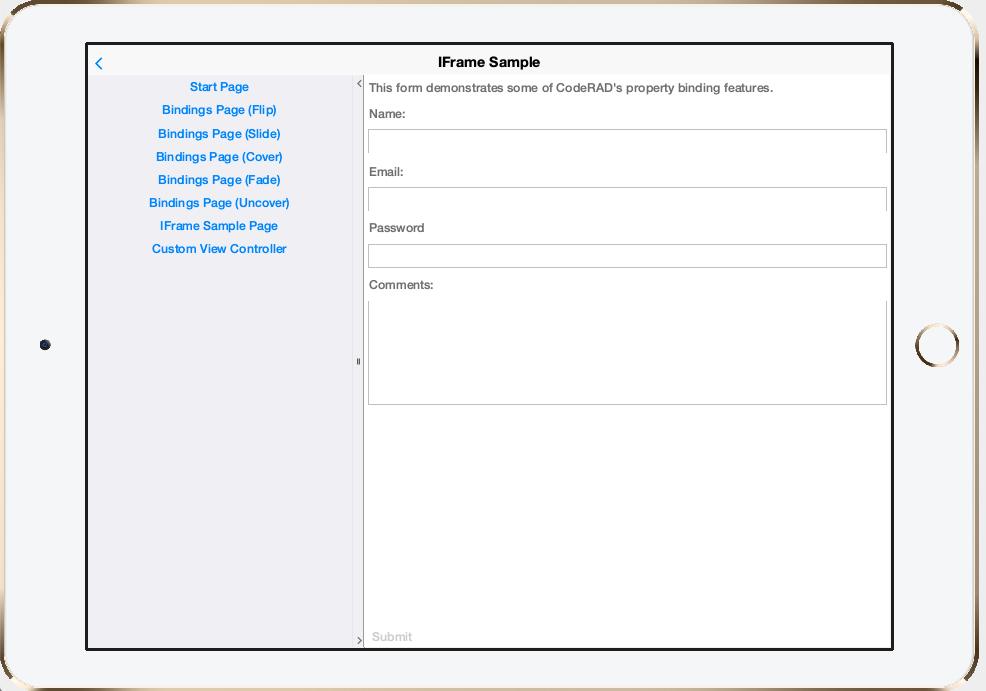
rad-href tag.The above example demonstrated the use of the rad-transition attribute to specify the transition that should be used for loading the views into their container.
The syntax is:
rad-transition="rad-href [duration] [effect name]"- duration
-
The duration of the transition in either milliseconds or seconds. E.g. "0.5s" would be 0.5s, and "300ms" would be 300 milliseconds.
- effect name
-
The name of the effect to use. One of "flip", "fade", "slide-up", "slide-down", "slide-left", "slide-right", "cover-up", "cover-down", "cover-left", "cover-right", "uncover-up", "uncover-down", "uncover-left", and "uncover-right".
Using the "sheet" target in the rad-href attribute allows you to load views into a Sheet instead of a new form, as demonstrated in the following snippet:
<?xml version="1.0"?>
<y xsi:noNamespaceSchemaLocation="SheetSample.xsd" xmlns:xsi="http://www.w3.org/2001/XMLSchema-instance">
    <title>Sheet Sample</title>
    <button rad-href="#StartPage sheet">Open Sheet</button>
    <button rad-href="#StartPage sheet-top">Open Sheet Top</button>
    <button rad-href="#StartPage sheet-left">Open Sheet Left</button>
    <button rad-href="#StartPage sheet-right">Open Sheet Right</button>
    <button rad-href="#StartPage sheet-center">Open Sheet center</button>
</y>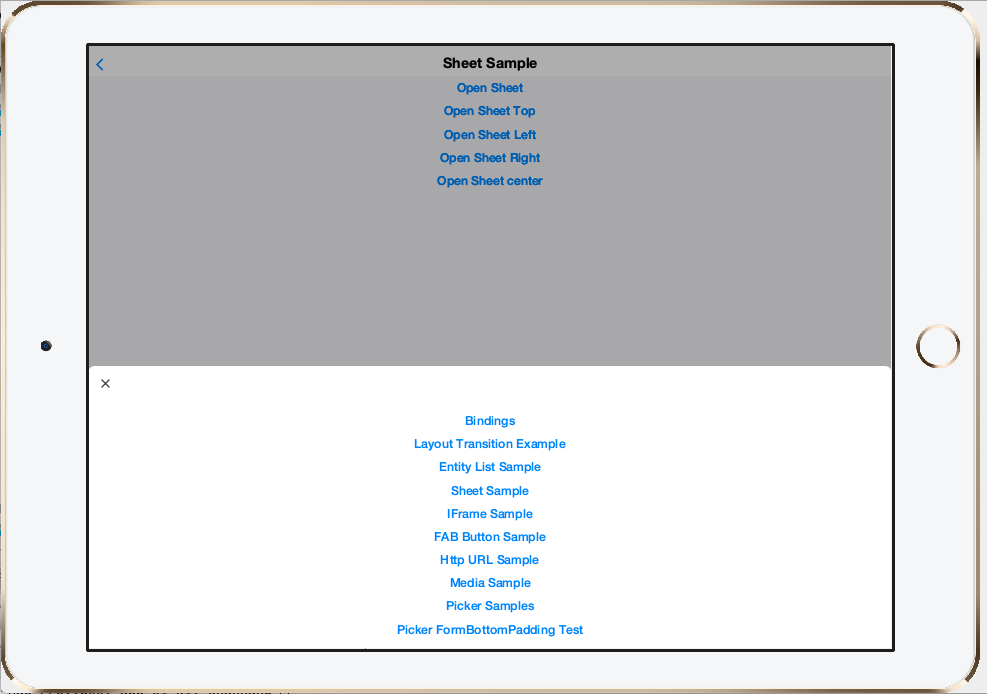
sheet-* targets in the rad-href attribute. The links on the top load a view as a sheet.You can alternatively provide a web URL (i.e. http:// or https://) in the rad-href attribute.
<button rad-href="http://www.codenameone.com _blank">Go to CodenameOne Site</button>This button will open the Codename One website in the platform’s native browser.
|
Note
|
Currently you must include the "_blank" target, which indicates that it should open in the system browser. Other targets will be available in future versions to allow loading webpages inside the app either as part of a browser component on the current form, or in a browser component in a new form. |
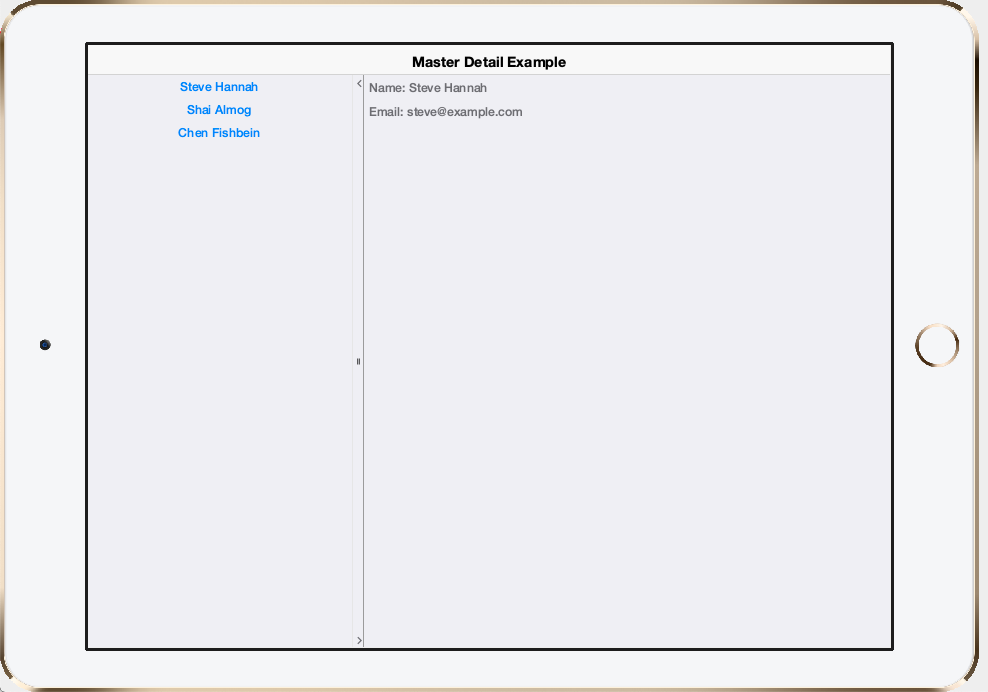
In some cases, you may need to provide a view model to the target view. For example, in a master-detail view where one panel contains a list records, and another panel contains a "detailed" view of a single record. You may want to use the rad-href attribute to load the detail view for the currently selected record.
This example involves four files:
- UserProfile
-
An Entity class encapsulating a user profile.
- SampleListProvider
-
A list provider that will be connected to an EntityList for displaying a list of profiles.
- MasterDetailView.xml
-
The Master view that contains the list of profiles on the left, and contains a a container to display the profile details of the currently-selected profile on the right.
- DetailView.xml
-
The view for displaying profile details.
package com.codename1.rad.sampler.models;

import com.codename1.rad.annotations.RAD;
import com.codename1.rad.models.Entity;
import com.codename1.rad.models.Tag;
import com.codename1.rad.schemas.Person;

@RAD
public interface UserProfile extends Entity {
    public static final Tag name = Person.name;
    public static final Tag photoUrl = Person.thumbnailUrl;
    public static final Tag email = Person.email;

    @RAD(tag="name")
    String getName();
    void setName(String name);

    @RAD(tag="photoUrl")
    String getPhotoUrl();
    void setPhotoUrl(String url);

    @RAD(tag="email")
    String getEmail();
    void setEmail(String email);
}package com.codename1.rad.sampler.providers;
import com.codename1.io.Log;
import com.codename1.rad.io.ResultParser;
import com.codename1.rad.models.AbstractEntityListProvider;
import com.codename1.rad.models.EntityList;
import com.codename1.rad.models.EntityListProvider;
import com.codename1.rad.sampler.models.UserProfile;
import com.codename1.rad.sampler.models.UserProfileImpl;
import com.codename1.ui.CN;
import java.io.IOException;
import static com.codename1.ui.CN.scheduleBackgroundTask;
public class SampleListProvider extends AbstractEntityListProvider {
@Override
public Request getEntities(Request request) {
EntityList out = new EntityList();
{
UserProfile profile = new UserProfileImpl();
profile.setName("Steve Hannah");
profile.setEmail("steve@example.com");
out.add(profile);
}
{
UserProfile profile = new UserProfileImpl();
profile.setName("Shai Almog");
profile.setEmail("shai@example.com");
out.add(profile);
}
{
UserProfile profile = new UserProfileImpl();
profile.setName("Chen Fishbein");
profile.setEmail("chen@example.com");
out.add(profile);
}
request.complete(out);
return request;
}
}<?xml version="1.0"?>
<splitPane xsi:noNamespaceSchemaLocation="MasterDetailView.xsd" xmlns:xsi="http://www.w3.org/2001/XMLSchema-instance">
<title>Master Detail Example</title>
<entityList provider="com.codename1.rad.sampler.providers.SampleListProvider.class">
<row-template>
<button text="java:rowModel.getText(Person.name)" rad-href="#DetailView{rowModel} sel:#DetailContainer"/>
</row-template>
</entityList>
<border name="DetailContainer"/>
</splitPane><?xml version="1.0"?>
<y rad-model="com.codename1.rad.sampler.models.UserProfile" xsi:noNamespaceSchemaLocation="DetailView.xsd" xmlns:xsi="http://www.w3.org/2001/XMLSchema-instance">
<title>Details</title>
<label>Name: ${Person.name}.text</label>
<label>Email: ${Person.email}.text</label>
</y>|
Note
|
For this to work, an instance of In this case we added the following snippet in the application controller’s @Override
protected void onStartController() {
super.onStartController();
addLookup(new SampleListProvider());
} |
Most of this example is just adding context, but the purpose of this example is to demonstrate how the UserProfile model is passed to the DetailView in the rad-href attribute:
<entityList provider="com.codename1.rad.sampler.providers.SampleListProvider.class">
<row-template>
<button text="java:rowModel.getText(Person.name)" rad-href="#DetailView{rowModel} sel:#DetailContainer"/>
</row-template>
</entityList>In our previous rad-href examples, we simply provided the name of the destination view. E.g. "#DetailView". This time we are also specifying a view model for the view:
rad-href="#DetailView{rowModel}In this case rowModel is a variable reference to the view model of the current row. This variable is always present inside a <row-template> tag.
|
Tip
|
When inside a <row-template> tag, the context.getEntity() method will also return the rowModel.
|
The general syntax to "pass" a view model to the view in a rad-href attribute is to append the model to the view name, wrapped in braces.
|
Tip
|
You can also use empty braces {} as short-hand for {context.getEntity()}. I.e. in this example we could done rad-href="#DetailView{}" and achieved the same result.
|
It is worth noting here that the DetailView.xml view includes a rad-model="com.codename1.rad.sampler.models.UserProfile" attribute, meaning that it expects its view model to of type UserProfile.
So far we have discussed the use of the rad-href attribute only on the <button> component. In fact any component that includes an addActionListener(ActionListener) method will accept a rad-href attribute. The link will be processed when the action event is triggered on the component.
When adding rad-href to an EntityView, you can also bind it to a particular action via the rad-action-trigger attribute. As an example, consider the <twtsearchButton> component that defines the "SEARCH_ACTION" category to allow controllers to respond to when the button is pressed:
<twtsearchButton
rad-href="#SearchForm"
rad-href-trigger="TWTSearchButton.SEARCH_ACTION"
/>In this case, when the SEARCH_ACTION is triggered in the twtsearchButton, it will link to the SearchForm view.
|
Tip
|
See CodeRADActions for an introduction to Actions |
You can bind actions to some components using the <bind-action> tag. For example, to bind an action to a buttton, you can place the <bind-action> tag inside the <button> tag as follows:
<button>
<bind-action category="SOME_CATEGORY"/>
</button>The category attribute should contain a java expression that resolves to an ActionNode.Category object. A common pattern is to define the action categories supported by the view inside the view itself using the <define-category> tag. E.g.
<define-category name="LOGIN_ACTION"/>
...
<button><bind-action category="LOGIN_ACTION"/></button>The <define-category> tag, here, will create an ActionNode.Category in our View like with a signature like:
public static final ActionNode.Category LOGIN_ACTION = new ActionNodel.Category("LOGIN_ACTION");So that the category="LOGIN_ACTION" in the <bind-action> tag is referring to this variable.
|
Important
|
If you do not register any actions in this category, the button will not be rendered in the view at all. |
You would then register an action in the LOGIN_ACTION category in the initControllerActions() method of one of your controllers. E.g.:
public void initControllerActions() {
super.initControllerActions();
ActionNode.builder()
.label("Login")
.addToController(this, MyView.LOGIN_ACTION, evt -> {
evt.consume();
// Handle the the button click event here.
});
}You can add <bind-action> as a child of any component, but the behaviour will vary depending on the component type. The expected behaviour is:
-
The component class must either include an
addActionListener(ActionListener)method or specify an alternative trigger mechanism using theonattribute. If theonattribute is specified, then it will look for a method on the component class namedadd{on}Listener()where{on}is the value of theonattribute. E.g.on="action"woudl be equivalent to the default behaviour of expecting anaddActionListener()method.This
addXXXListenermethod will be used to attach the event listener which will trigger the action event, which will be dispatched to the controller hierarchy. -
If the component is a
<button>,<multiButton>, or subclass thereof, the action will also be bound to certain properties of the component such as label, icon, enabled, visible, etc… This is to allow the controller to control things like the label, style, and state of the button.
|
Tip
|
See the Buttons component also, which renders multiple actions in an action category as a menu of buttons. |
When the action is triggered, it will dispatch an ActionNode.ActionEvent action to the controller hierarchy. If it is not consumed by any of the controllers, then the action can be processed by a default handler that is defined in the text content of the bind action. E.g.
<button>
<bind-action category="CLICKED_ACTION">
System.out.println("This action was not handled by any controller.");
</bind-action>
</button>The contents of the action work like a <script> tag, with Java code embedded directly. This code is run inside the action listener. This handler has access to two variables in addition to the usual ones:
- it
-
A reference to the component that wraps the
<bind-action>tag. In the above example, it would be aButtonobject. - event
-
The
ActionNode.ActonEventobject.
For Button and MultiButton objects, the action will override the label and icon properties if the action defines them. You can still specify label and icon properties on the button, however, and they will be used still if the bound action doesn’t explicitly define these properties.
e.g.
<button text="Click Me">
<bind-action category="CLICK_ACTION"/>
</button>…
ActionNode.builder().label("Don't click me")
.addToController(this, CLICK_ACTION, evt -> {});In the above example, the button text would be "Don’t click me", because the action explicitly set the label. However if we change the action definition to the following:
ActionNode.builder()
.addToController(this, CLICK_ACTION, evt -> {});then the button label would be "Click Me", as specified by the text attribute of the button.
The <script> tag allows you to embed Java source code directly into the view to be executed at the time that its parent component is created. This should be used sparingly is it breaks the philosophy of MVC, which dictates that logic should be in the controller.
<textField>
<script><![CDATA[
it.addActionListener(evt -> {
System.out.println("Text field text is "+it.getText());
});
System.out.println("Creating textfield "+it);
]]></script>
</textField>|
Tip
|
Java expressions in XML attributes have access to the same execution environment that is described in this section. |
The script execution environment includes one special variable it that contains a reference to the parent component. In the above example, it refers to the TextField object created by the <textField> tag.
The following variables are also available:
- boolean rowFocused
-
If inside a
<row-template>tag, this refers to whether the current row is focused or not. - int rowIndex
-
If inside a
<row-template>tag, this refers to the row index (zero-based). - EntityList rowList
-
If inside a
<row-template>tag, this refers to the parentEntityListcomponent. - Entity rowModel
-
If inside a
<row-template>tag this refers to the view model for the current row. Otherwise it will be null. - boolean rowSelected
-
If inside a
<row-template>tag, this indicates whether the row being rendered is selected or not. - EntityView rowView
-
If inside a
<row-template>, this will refer to theEntityViewfor the current row. Otherwise it will be null. - EntityView view
-
If inside a
<row-template>, this will refer to theEntityViewfor the current row. Otherwise this will refer to the view itself. - ViewContext context
-
The view context at the location of the
<script>tag. This context will include the view model and controller of the nearest parent that specifies it. E.g. If inside a<row-template>tag, then this context will include the row model, rather than the root view model. If a parent tag specifies theview-controllerattribute, then the context will have this controller instead of the root view’s controller. - FormController formController
-
A reference to the FormController object for the view.
- ApplicationController applicationController
-
A reference to the application controller object.
- ViewController viewController
-
A reference to the view controller to the nearest view controller at the location of the
<script>tag. Equivalent tocontext.getController(). - AppSectionController sectionController
-
A reference to the app section controller.
- FormController parentFormController
-
A reference to the parent form controller for the current form. May be null.
|
Tip
|
See script for more information about the <script> tag.
|
You can attach a custom view controller to any component via the view-controller attribute. If you want to attach actions to the view, the recommended approach is to create a custom view controller class, and reference it in the view-controller attribute of the root tag of the view.
<?xml version="1.0" ?>
<y view-controller="com.example.myapp.controllers.MyViewViewController">
<title>My View</title>
</y>package com.example.myapp.controllers;
import com.codename1.rad.controllers.Controller;
import com.codename1.rad.controllers.ViewController;
import com.codename1.rad.nodes.ActionNode;
import com.codename1.rad.sampler.CustomViewControllerSample;
import com.codename1.rad.schemas.Person;
//...
public class MyViewViewController extends ViewController {
/**
* Creates a new ViewController with the given parent controller.
*
* @param parent
*/
public MyViewViewController(Controller parent) {
super(parent);
}
@Override
protected void initControllerActions() {
super.initControllerActions();
//...
}
}|
Tip
|
If you specify the view-controller attribute, then viewController and context.getController() will return a reference to this view-controller instances in java expressions and script tags inside this tag.
|
When embedding other views (or any EntityView subclass) in your view, you should specify a view model for the view using the view-model attribute. You can optionally use the special "new" value here, to direct the view to create a new instance of its preferred view model here.
As an example, consider the following view:
<?xml version="1.0"?>
<y rad-model="com.codename1.rad.sampler.models.UserProfile" xsi:noNamespaceSchemaLocation="DetailView.xsd" xmlns:xsi="http://www.w3.org/2001/XMLSchema-instance">
    <title>Details</title>
    <label>Name: ${Person.name}.text</label>
    <label>Email: ${Person.email}.text</label>
</y>We can embed this view in another view in a few different ways. The following view, EmbeddedDetailsViews demonstrates a few of these:
<?xml version="1.0" ?>
<y xsi:noNamespaceSchemaLocation="EmbeddedDetailViews.xsd" xmlns:xsi="http://www.w3.org/2001/XMLSchema-instance">
    <import> (1)
        import com.codename1.rad.sampler.models.*;
        import com.codename1.rad.sampler.providers.*;
    </import>
    <title>Embedded Detail Views</title>
    <var name="user1" type="UserProfile"/> (2)
    <var name="user2" type="UserProfile"/>
    <script>
        user1 = new UserProfileImpl(); (3)
        user2 = new UserProfileImpl();
        user1.setName("Steve");
        user2.setName("Shai");
    </script>
    <label>Detail View for user1</label>
    <detailView view-model="user1"/> (4)

    <label>Detail View for user2</label>
    <detailView view-model="user2"/> (5)

    <label>DetailView embedded in list view</label>
    <entityList provider="SampleListProvider.class">
        <row-template>
            <!-- We explicitly reference the "rowModel" as the view-model here -->
            <detailView view-model="rowModel"/> (6)
        </row-template>
    </entityList>

    <label>DetailView embedded in list view 2</label>
    <entityList provider="SampleListProvider.class">
        <row-template>
            <!-- This demonstrates dependency injection as the rowModel will be used
                as the view model implicitly here. -->
            <detailView /> (7)
        </row-template>
    </entityList>
</y>-
We import some model and provider classes that can be used for the view model of DetailView.
-
We use
<var>tags to explicitly define variables to hold a couple ofUserProfilemodels. -
We create a couple of
UserProfilemodels inside a<script>tag. -
We use the
UserProfilein theuser1variable as theview-modelfor a DetailView. -
We use the
UserProfilein theuse2variable as theview-modelfor another DetailView. -
We create a DetailView inside an EntityList row template, explicitly passing the
rowModelas the view model. We used theSampleListProvider.classwhich is an EntityListProvider defined in a controller. -
We create a DetailView inside an EntityList row template, implicitly passing the current row model via dependency injection.